Appsero Feature Drop 🎉: Introducing bundle products, Mailchimp eCommerce integration, plugin/theme usage data collection, UI updates, and more
Appsero was already an effective license management tool for the developers, it just got better with a pack of amazing new features and design improvements. What are those? In this release, we’re dropping Add Bundle Product, Theme Deactivation Data, Plugin Usage Data, Mailchimp Tag, Icon and Banner, and Mailchimp eCommerce Integration features.
Now you’ll be able to add more than one product at once, optimize your product using the theme/plugin usage data, integrate Mailchimp eCommerce, and stylize your products with icons and banners.
Our developer team has worked really hard for the last 6 months to take Appsero to the next level. They went through painstaking development and testing phases to bring bug-free and functional Appsero features for you and fellow WordPress plugin and theme developers.
This blog will walk you through all six new features and a few other intuitive UI improvements. Before that, let me introduce you to Appsero in case you still don’t know why it is so special.
Why WordPress developers should choose Appsero for managing and selling plugins and themes
Appsero allows WordPress developers to manage licenses, create releases, push updates directly from Git, sell plugins and themes, get usage analytics, and more. You can get rid of the huge workload and hassle by entrusting Appsero with all these tasks.
Interestingly, it’s free for everyone until you want to manage licenses using it. You can manage unlimited free plugins and themes with the free version. The free plan includes amazing features like the following ones:
- Plugin/Theme Usage Analytics
- 8 Useful Integrations
- Access to All Reports (up to 2 months)
- Seamless Git Deployment
- Deactivation Feedback, and more.
Since the inception of Appsero, we’ve been trying to improve our product in each version. We enabled selling WordPress products through WooCommerce, EDD, Envato, FastSpring, Paddle, Gumroad, and more. As a part of our continuous research and development process, we’re introducing a bunch of new and helpful features in our latest release. Without further ado, let’s unveil the features and updates.
Appsero Introduces 5+ New Features and a More Intuitive UI
Let’s talk about the features first. You’ll get updates about the design improvements in a later section. Here’s the list of the features we’re introducing for the latest version of Appsero.
- Add Bundle Product
- Theme Deactivation Data
- Plugin Usage Data
- Mailchimp Tag
- Add Banner to Plugin Updates
- Mailchimp eCommerce Integration with Appsero
We’ve prepared detailed documentation for each new feature. So, you can configure Appsero and reap the benefits of these features on your own with our easy-to-follow guides. Let’s explore the upcoming Appsero features in the following sections.
Add Bundle Product
Why You Need the Add Bundle Product Feature:
This is one of the most sought features of Appsero. It enables developers to sell more than one WordPress product at the same time. You can combine both plugins and themes for a bundle using this Appsero feature. Add Bundle Product feature adds a new dimension to Appsero’s selling capabilities.
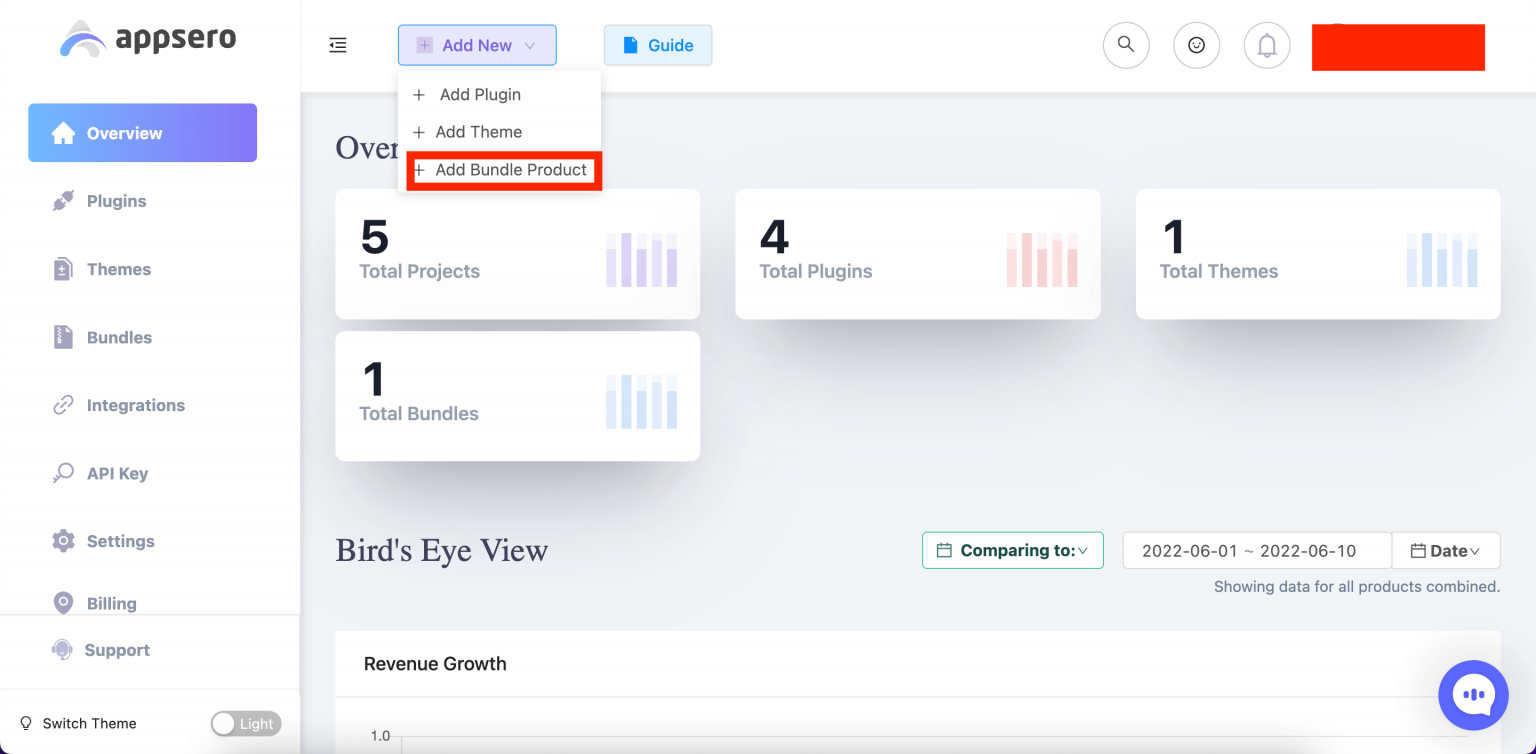
How You Can Add a Bundle:
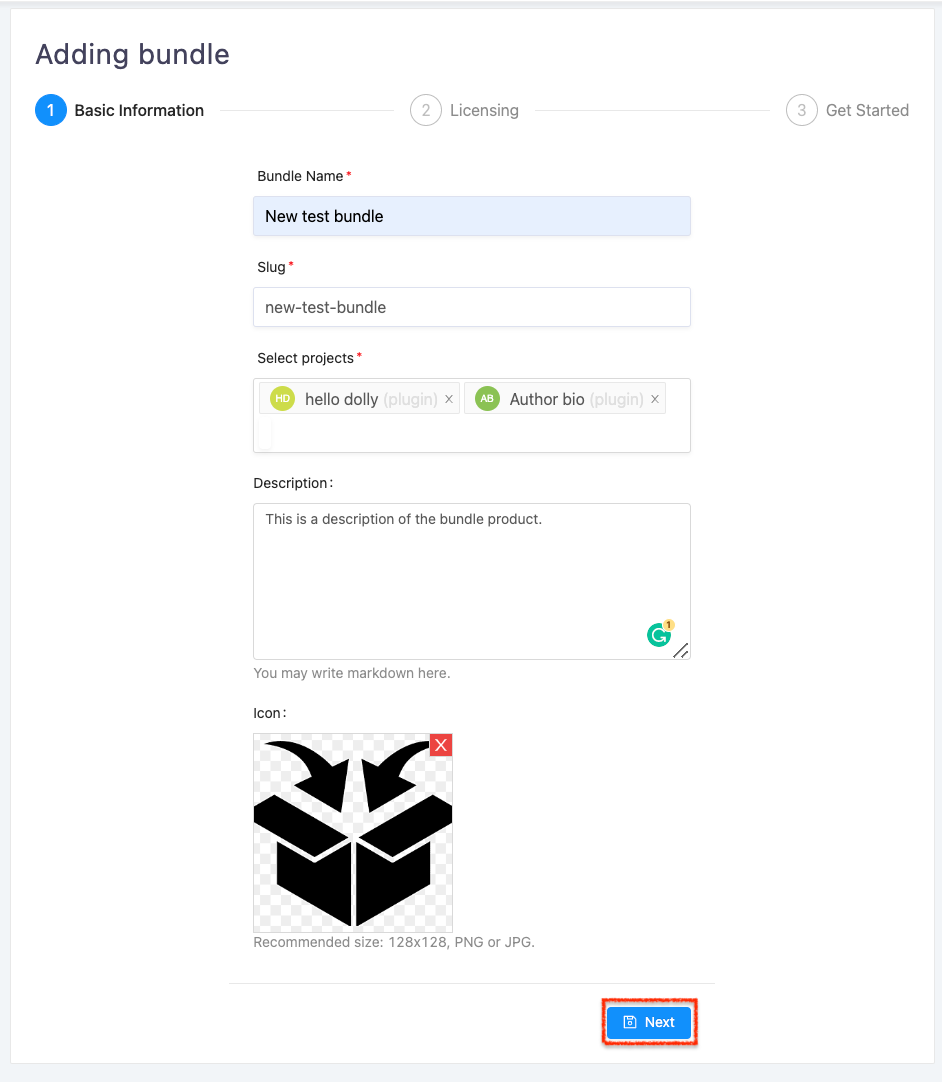
Go to your Appsero dashboard and click on the Add New dropdown menu from the top bar. You’ll see three options, select Add Bundle Product from there.
Then fill up all required fields like Bundle Name, Slug, Select Products, and hit the Next button.
Then complete the next steps by following the standard operating procedures of Appsero. You can follow this Documentation for detailed guidelines. Start selling once the bundle is added successfully.
Buyers will get all the products you include within a bundle and can use a single license key for available plugins and themes. Know how you can add and sell WordPress bundle products from here:
Theme Deactivation Data

Why You Need the Theme Deactivation Data Feature:
WordPress works hand in hand with plugins and themes. Every WordPress website runs on a theme. Users may uninstall your plugin if they find their preferred theme is less compatible with your plugin.
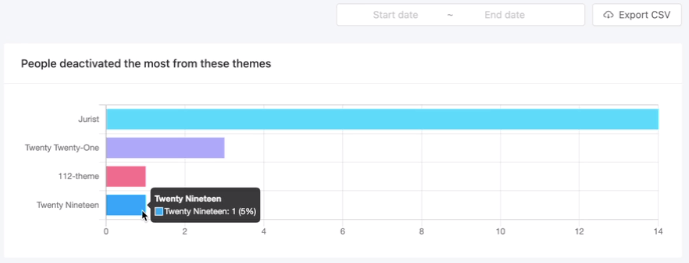
Appsero now has a solution. It shows the list of themes from where your plugins are getting uninstalled the most. You can use these pieces of information to optimize your product for the respective themes. Thus, it’s possible to decrease your plugin’s deactivation rate.
How You Can See the Data:
Log in to your Appsero dashboard and choose the plugin you want to analyze. You’ll get the Analytics option from the left sidebar. Click on this option to open the submenus. Then hit Reports.
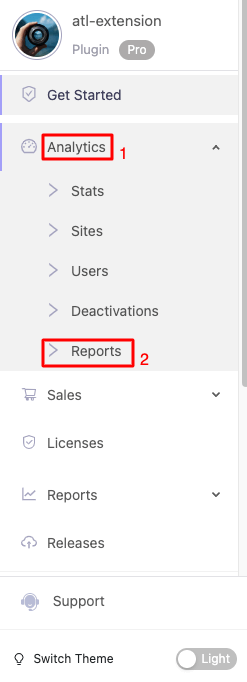
You’ll get all your activation and deactivation data from here. Scroll down to find the themes that are responsible for the most deactivation. You can export the report from here.
This is a premium feature and you need to integrate Appsero SDK properly to get these data at your disposal.
Documentation for Theme Deactivation Data feature.
Plugin Usage Data
Why You Need the Plugin Usage Data Feature:
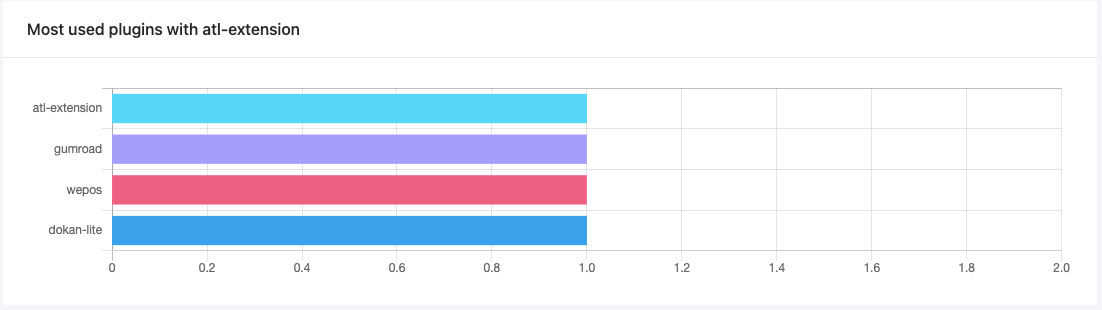
Each WordPress user runs multiple plugins on his website. This Appsero feature helps you know the names of the most used plugins along with your plugin. As a developer, you can use this data to improve your product more.
You can optimize your plugin to work better with the most used plugins. You can market its compatibility. Most importantly, you can add new features after analyzing these data meticulously.
How You Can See the Data:
Again, navigate to the Analytics option from the left sidebar of your product dashboard. Click on the Reports option and scroll down to find the most used plugin data. Export the data if you need it.
This is also a premium feature and you need to modify the Appsero SDK to allow it to send relevant data.
Get more help from Plugin Usage Data Documentation.
Mailchimp Tag

Why You Need the Mailchimp Tag Feature:
Now you can track the customers of a specific theme or plugin from the Mailchimp contacts list. You’ll get the basic information of your customers and detect which plugin they’ve bought by using this Mailchimp tag.
How You Can Enable the Tag:
Choose the plugin to which you want to add the Mailchimp tag. Navigate to the Integrations option and select Mailchimp to configure.
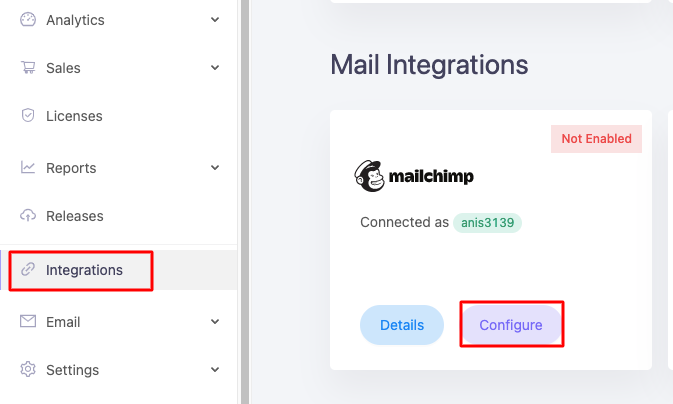
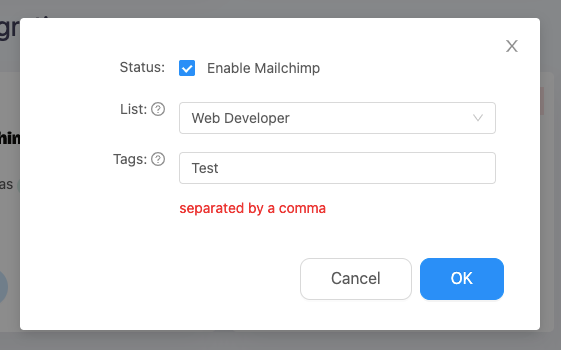
Fill up the fields with relevant mailing lists and tags. Tick the Enable Mailchimp checkbox and hit the OK button to move further.
Once your integration is successful, you’ll see the tags as shown in the following picture.
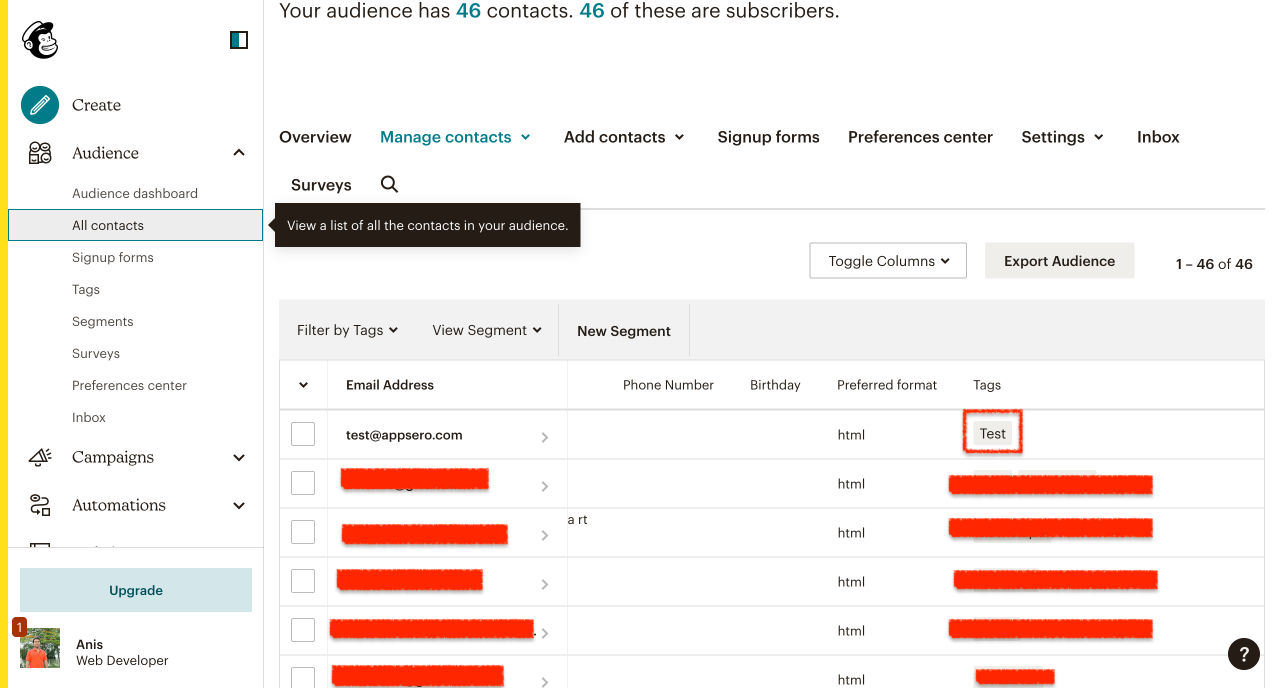
Read this Documentation if you need more guidance.
Add Banner to Plugin Updates
Why You Need the Add Banner to Plugin Updates Feature:
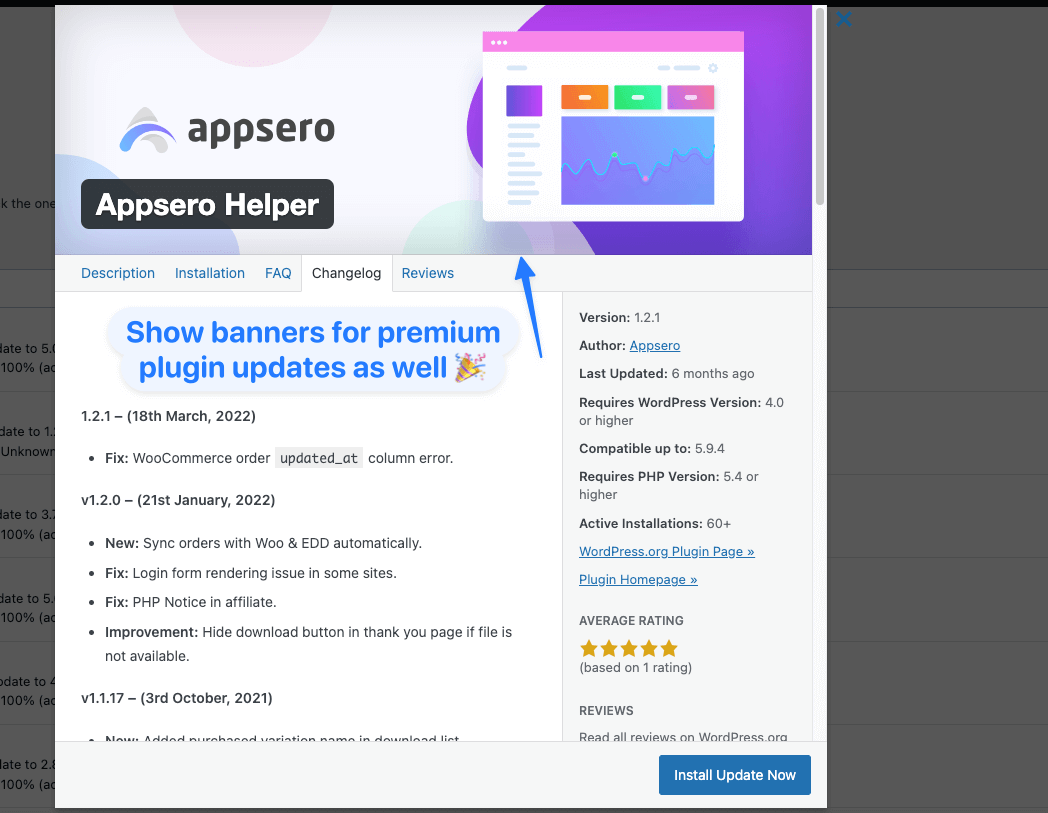
This feature allows plugin owners to stylize a plugin’s interface for a better user experience. You can set icons and banners for your listed products on Appsero. End users will see the changes if they update their plugins to the latest version.
How You Can Upload Banners and Icons:
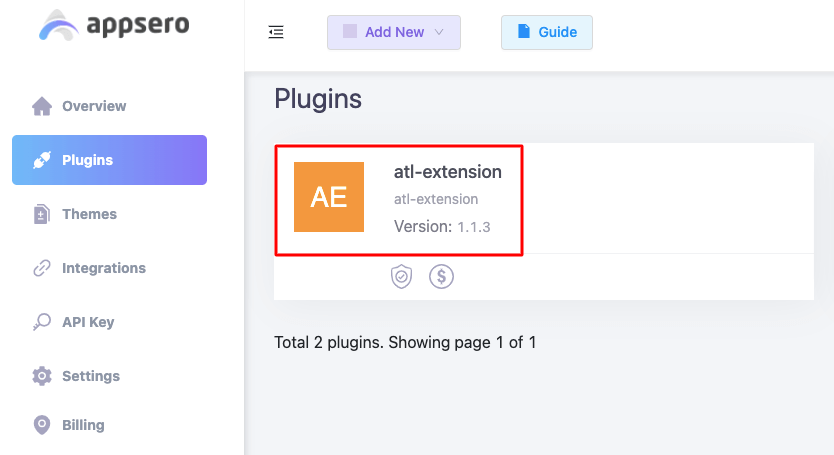
Navigate to your Appsero dashboard and choose Plugins from the left sidebar. Choose the plugin you want to add an icon and banner to.
Then click on the Settings menu, It will open a few options along with Icon and Banner.
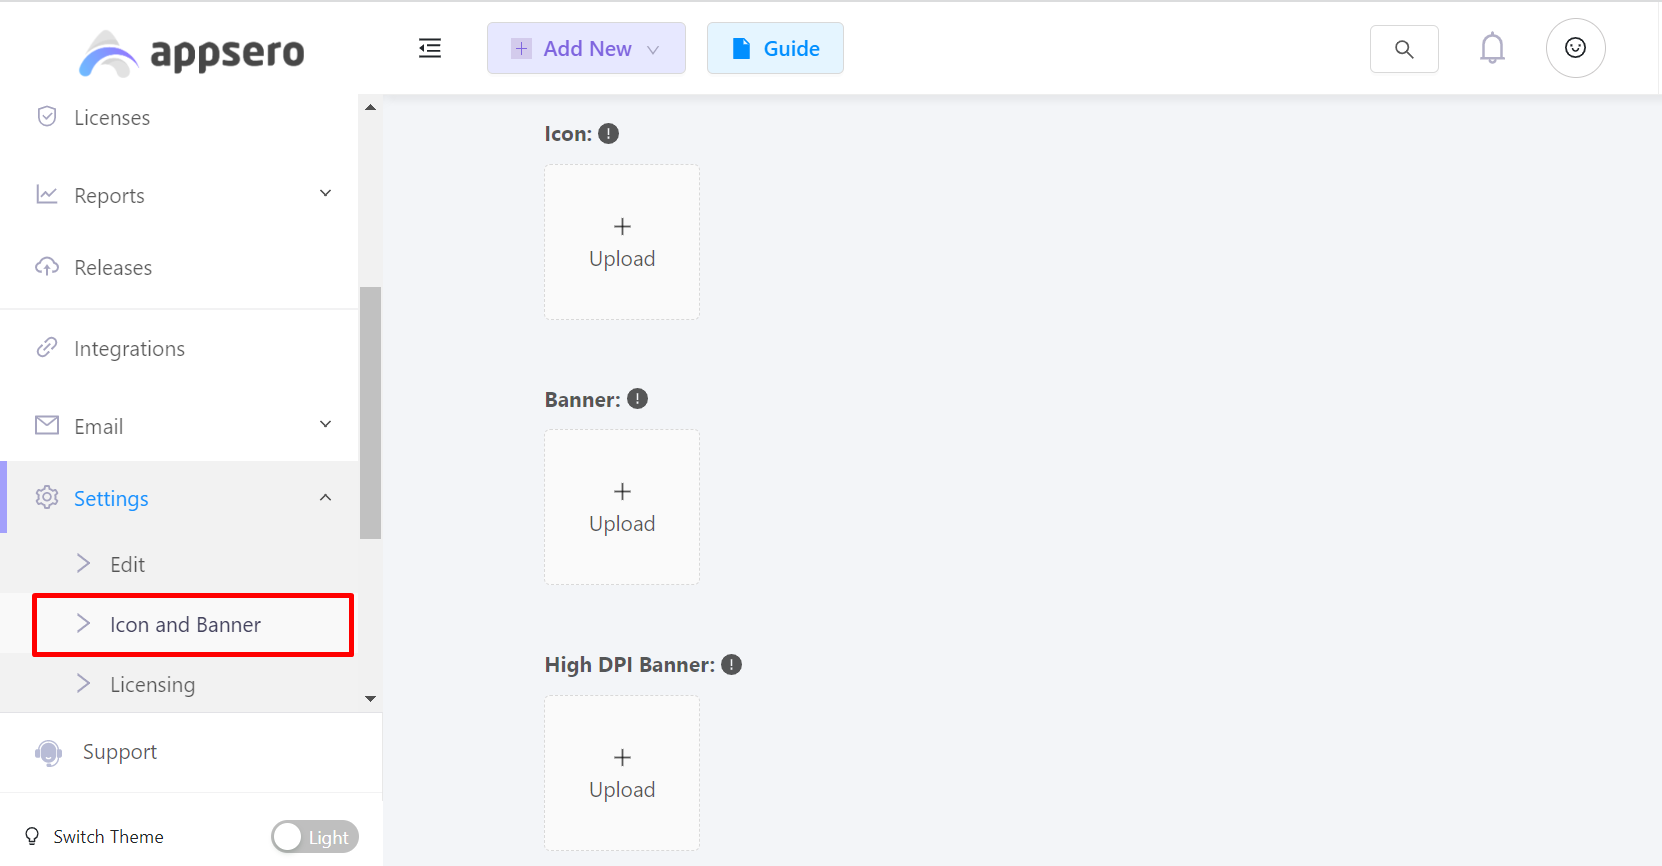
Upload your plugin Icon and Banner from your computer and crop as you see fit to specify the visible area. We’ve mentioned the recommended sizes for icons and banners for your convenience. The updated banner will appear as shown in the following image.
Appsero also has the option to upload High DPI Banner for high-end devices like Apple MacBook Pro and other devices that come with Retina displays.
Read the Add Banner to Plugin Updates Feature Documentation for more help.
Mailchimp eCommerce Integration with Appsero
Why You Need the Mailchimp eCommerce Integration Feature:
You can get customer details like Email, Name, Address, Phone Number, Birthday, and sales data like Email Open Rate, Click Rate, Total Revenue, Average Order Value, and more by connecting Mailchimp eCommerce with your Mailchimp store through Appsero.
You can even associate each individual product with tags to segment your customers based on products. It will facilitate your marketing campaigns to a great extent.
How You Can Sync the Integration:
At first, build a store in Mailchimp. You need to add the product name, price, location, and other necessary information.

Now, go to your Mailchimp account from the below-left corner and choose Account & billing.
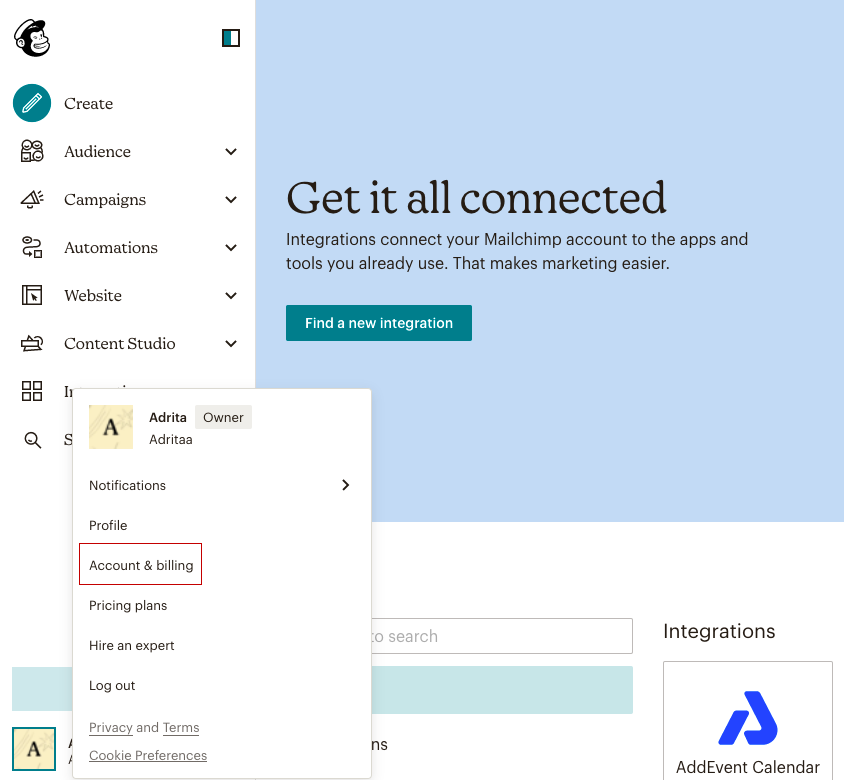
It will take you to a new page. Click on Extras from the top bar and select the API eys option to get the API key that you need to connect your store with Appsero.

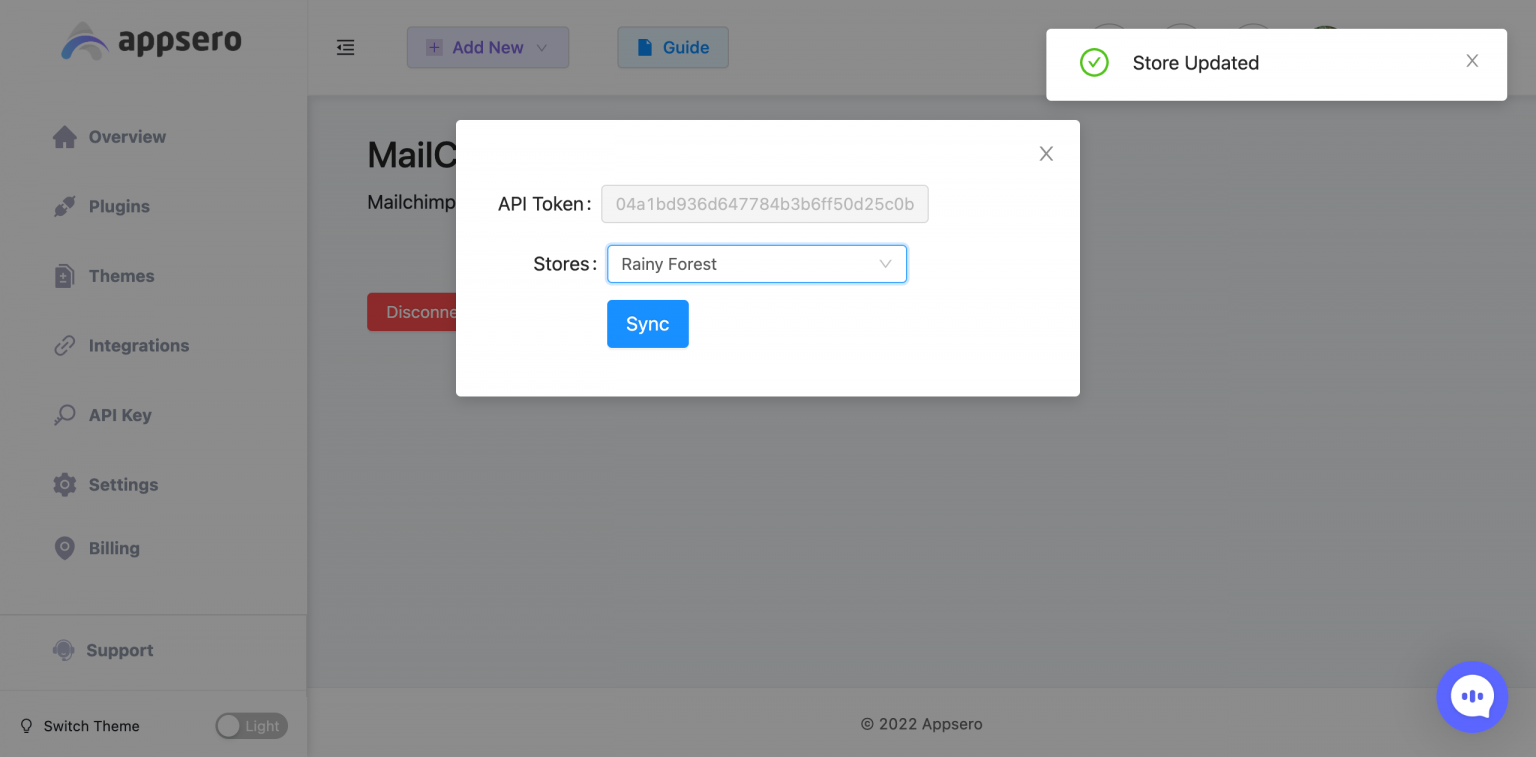
Now go to the Appsero integrations page and paste the API you got here. Select a Store from the dropdown menu. And, hit the Sync button. If everything goes right, you’re done with Mailchimp eCommerce integration with Appsero.
Let’s see an example of how you will get the details from this integration.
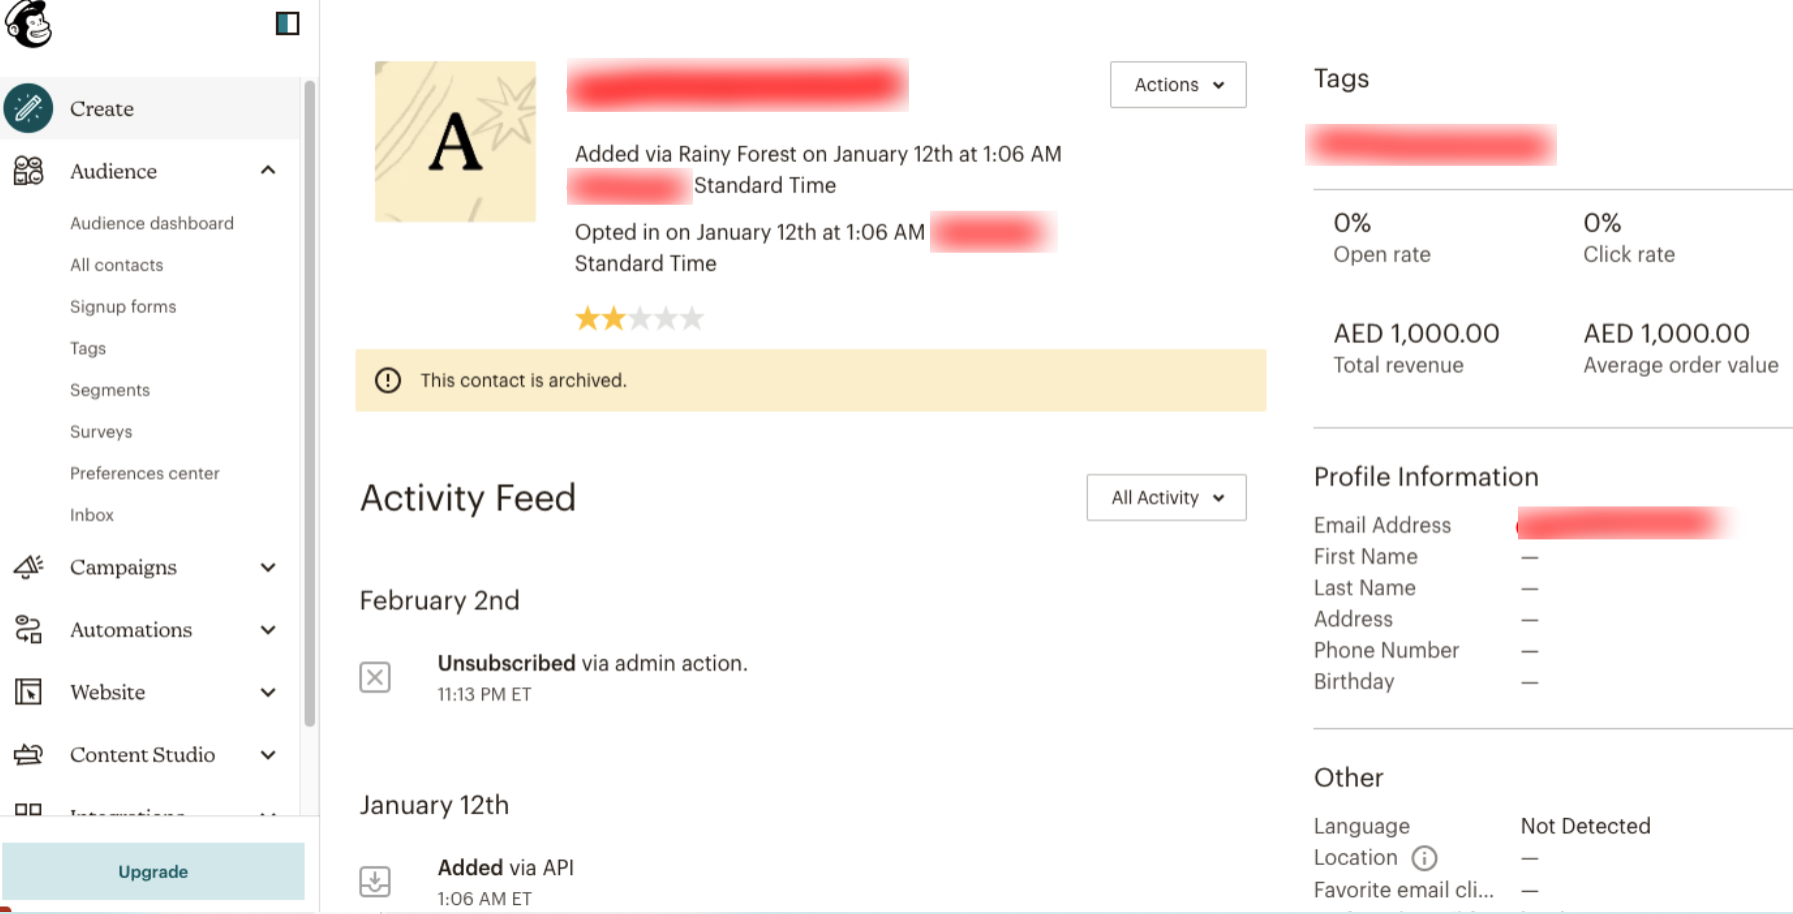
You will get all the important personal details of that specific customer. Most interestingly, the user Activity Feed WILL show you the actions taken by the customer throughout his purchase history.
Learn how you can integrate Mailchimp eCommerce with your Appsero from this Documentation.
We’ve prepared a detailed video as well to guide you through the integration process. The following video explains how to Integrate Mailchimp eCommerce with Appsero for WordPress Plugin Management.
A More Intuitive User Interface to Improve User Experience
We’re determined to cater to the needs of Appsero users. All our experts have a growth mindset that pushes us to evolve each day. If there’s room for improvement, we’ll definitely get started on it. So, here’s an example of our extensive R&D which resulted in the following user interface for the Overview and Integrations pages.

Have a deep insight into Appsero’s New User Interface for Dashboard and Integration from the next video:
Don’t hesitate to contact us if you have any suggestions or feedback. We’ll take your opinions into account and convey the message to the concerned persons.
Do More Than Just License Management with Appsero
Other than managing licenses with Appsero, you can do a lot more additional things to get the best out of your WordPress plugins and themes. Appsero instantly deploys updates to all premium users to their WordPress dashboard.
You can see, analyze, and export insightful user data to track your products’ performance.
You can enable marketing automation by gathering customers’ feedback and sending automated deactivation responder emails.
You can deploy updates directly using Git from your terminal through Appsero’s push-to-deploy feature.
You can seamlessly integrate with all necessary parties to improve Appsero’s functionality.
Last but not least, Appsero has easily navigable documentation to guide your journey. And, we have a support team that works 24/7 to solve all your issues.
Subscribe To Our Newsletter
Don’t miss any updates of our new templates and extensions
and all the astonishing offers we bring for you.


