Here are the steps to install Appsero Client.
Video Tutorial
Watch the video tutorial to quickly understand how to integrate Appsero SDK.

Installation
You can install Appsero Client in two ways, via composer and manually.
1. Composer Installation
Add dependency in your project (theme/plugin):
composer require appsero/clientNow add autoload.php in your file if you haven’t done already.
require __DIR__ . '/vendor/autoload.php';2. Manual Installation
- Clone the Appsero Client Github repository in your project.
cd /path/to/your/project/folder
git clone https://github.com/AppSero/client.git appsero
Now include the dependencies in your plugin/theme.
require __DIR__ . '/appsero/src/Client.php';Enable Insights
Appsero client can be used in both themes and plugins.
The Appsero\Client class has three parameters:
$insights = new Appsero\Client( $hash, $name, $file );- hash (string, required) – The unique identifier for a plugin or theme.
- name (string, required) – The name of the plugin or theme.
- file (string, required) – The main file path of the plugin. For theme, path to
functions.php
Enable Updater
Since Appsero Client V1.3.0, the Updater is separated to a standalone Updater repo. if you are managing your plugin and theme updates through Appsero, you’ll need to manually include it in your plugin. Read more how to implement the Appsero updater.
Usage Example
Please refer to the Installation step before starting to use the class.
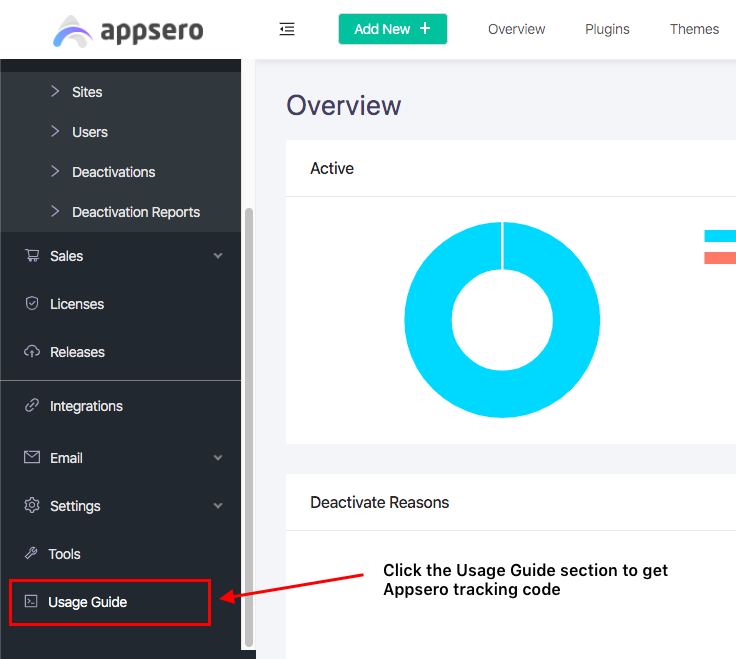
You can obtain the tracker code for your plugin for the Appsero Dashboard’s Usage Guide section.

The 3rd parameter must have to be the main file of the plugin.
/**
 * Initialize the tracker
 *
 * @return void
 */
function appsero_init_tracker_appsero_test() {

    if ( ! class_exists( 'Appsero\Client' ) ) {
      require_once __DIR__ . '/appsero/src/Client.php';
    }

    $client = new Appsero\Client( 'a4a8da5b-b419-4656-98e9-4a42e9044891', 'Akismet', __FILE__ );

    // Active insights
    $client->insights()->init();

    // Active automatic updater
    $client->updater();

    // Active license page and checker
    $args = array(
        'type'       => 'options',
        'menu_title' => 'Akismet',
        'page_title' => 'Akismet License Settings',
        'menu_slug'  => 'akismet_settings',
    );
    $client->license()->add_settings_page( $args );
}

appsero_init_tracker_appsero_test();
Do not copy this code. Your unique tracking code is available inside Appsero Dashboard’s Usage Guide section. Also, make sure you call this function directly, never use any action hook to call this function.
For plugins example code that needs to be used on your main plugin file. For themes example code that needs to be used on your themes
functions.phpfile.
More Usage
Sometimes you wouldn’t want to show the notice or want to customize the notification message. You can do that as well.
$client = new Appsero\Client( 'a4a8da5b-b419-4656-98e9-4a42e9044892', 'Twenty Twelve', __FILE__ );1. Hiding the notice
$client->insights()
       ->hide_notice()
       ->init();
2. Customizing the notice message
$client->insights()
       ->notice( 'My Custom Notice Message' )
       ->init();
3. Adding extra data
You can add extra metadata from your theme or plugin. In that case, the keys have to be whitelisted from the Appsero dashboard.
$metadata = array(
    'key'     => 'value',
    'another' => 'another_value'
);
$client->insights()
       ->add_extra( $metadata )
       ->init();
OR
$metadata = function () {
    return array(
        'key'     => 'value',
        'another' => 'another_value'
    );
};
$client->insights()
       ->add_extra( $metadata )
       ->init();
Dynamic Usage
If you are adding the Appsero client for a WordPress.org plugin or theme – it’s strictly prohibited to hide the admin notice. You might get banned for hiding the pop-up notice.
However, if you are distributing your plugin elsewhere, you can call the $insights->optin()
$client = new Appsero\Client( 'a4a8da5b-b419-4656-98e9-4a42e9044892', 'Twenty Twelve', __FILE__ );

$insights = $client->insights();
$insights->hide_notice()->init();

// somewhere in your code, opt-in the user forcefully
// execute this only once
$insights->optin();
Checking License Validity
Check your plugin/theme is using with a valid license or not, First create a global variable of License object then use it anywhere in your code. If you are using it outside of the same function make sure you use the global variable before using the condition.
$client = new Appsero\Client( 'a4a8da5b-b419-4656-98e9-4a42e9044892', 'Twenty Twelve', __FILE__ );

$args = array(
    'type'        => 'submenu',
    'menu_title'  => 'Twenty Twelve License',
    'page_title'  => 'Twenty Twelve License Settings',
    'menu_slug'   => 'twenty_twelve_settings',
    'parent_slug' => 'themes.php',
);

global $twenty_twelve_license;
$twenty_twelve_license = $client->license();
$twenty_twelve_license->add_settings_page( $args );

if ( $twenty_twelve_license->is_valid()  ) {
    // Your special code here
}

Or check by pricing plan title

if ( $twenty_twelve_license->is_valid_by( 'title', 'Business' ) ) {
    // Your special code here
}
Using your own license form
You can easily manage the license by creating a form using an HTTP request. Call the methodlicense_form_submit from your License object.
global $twenty_twelve_license; // License object
$twenty_twelve_license->license_form_submit([
    '_nonce'      => wp_create_nonce( 'Twenty Twelve' ), // create a nonce with name
    '_action'     => 'active', // active, deactive
    'license_key' => 'random-license-key', // no need to provide if you want to deactive
]);
if ( ! $twenty_twelve_license->error ) {
    // license activated
    $twenty_twelve_license->success; // Success message is here
} else {
    $twenty_twelve_license->error; // has error message here
}
