An 8 Step Guide on How to Create a Readme.txt File for WordPress (Plus Tips and Tools)
If you’re a newbie WordPress plugin developer, you must have heard the term readme.txt for sure. It’s a text file written with markdown syntax formatting. This document consists of the introductory information along with other technical specifications of a plugin.
There are more than 60k plugins available on the WordPress repository. But, only a handful of them has a well-written readme.txt file. The absence of SEO-friendly readme text affects your plugin’s online presence.
At the same time, it deprives users of their access to information. So, you should write a complete readme file comprising keywords, descriptions, features, version numbers, changelog, and more.
Writing a readme document is easier but you need to keep a few technical things in mind as well. In this article, we’re going to show you how to create a readme.txt file for your next plugins.
Navigate to the sections quickly by clicking on the following links:
- What Actually Is Readme.txt
- Why Readme.txt Files Matter for Your Plugins
- How to Create a Readme.txt File for Your WordPress Plugin
- Example of a Standard Readme.txt File for WordPress Plugin
- Use a WordPress Readme Generator Tool to Avoid Hassles
- Bonus Tips – How to Optimize Your WordPress Plugin for SEO
- How to Get a Good Average Rating for Your Plugins (Only for Beginners)
What Actually Is Readme.txt

A readme file informs the users about a project/software with a detailed description that includes basic information, how-to guidelines, FAQ, upgrade notice, and more.
All WordPress plugins should have the main PHP file along with a readme.txt file. The readme.txt is usually written using a well-defined subset of markdown. You add the required information in the correct format, and the WordPress repository parses it using markdown language.
It pulls the information from the readme.txt file and pastes it into the public repository. Then, the information appears on different sections of the specific plugin page, and all users can see them.
Mika Epstein, a WordPress Plugin Review Team Rep, rightly said:
At it’s heart, the Readme.txt file is pretty basic. You put in the information, it generates a WordPress page. Of course, it’s not all simple magic, and there are some weird things to be aware of.
You can’t just write plain text as you see appropriate for your plugin. WordPress follows a global practice to keep everything in harmony. It’s difficult to reach your target audience with a poorly written readme file. So, we’ve discussed How to Create a Readme.txt File for WordPress in a later section of this blog. Keep reading to learn more.
Why Readme.txt Files Matter for Your Plugins

A substandard readme.txt doesn’t mean you have a substandard product. But, it surely indicates that you have less attention to detail. On the contrary, an awesome readme file may initially impress your audience even if your product is not up to the mark.
Here’s a list of the benefits of writing an excellent readme.txt file.
- A well-written readme.txt helps your plugin rank
- It lets you introduce your plugin to the whole world
- You can flex the amazing features of your product
- It educates potential users about the installation process
- It gives answers to the most common questions a user might have
- A readme.txt can link to your website and other products
- You can upsell your products and services subtly
Now, you know the benefits. Let’s learn how to write a great readme.txt file.
How to Create a Readme.txt File for Your WordPress Plugin
A readme.txt file usually contains header information, description, FAQ, screenshots, and other information. The following section has precise and concise guidelines on how to write each section perfectly. Keep reading to learn the art of writing readme.txt files for your WordPress plugin.
1. Understand What Is Markdown Syntax
You need to follow markdown syntax while writing a readme.txt. Markdown refers to a plain text formatting system that converts plain text into HTML. You can learn more about Markdown Syntax from the Daring Fireball project developed by John Gruber.
Let’s have a look at how markdown translates text into HTML from the following examples.
Markdown Text:
A First Level Header
====================

A Second Level Header
---------------------

Now is the time for all good men to come to
the aid of their country. This is just a
regular paragraph.

The quick brown fox jumped over the lazy
dog's back.

### Header 3

> This is a blockquote.
>
> This is the second paragraph in the blockquote.
>
> ## This is an H2 in a blockquote
Output in HTML:
<h1>A First Level Header</h1>

<h2>A Second Level Header</h2>

<p>Now is the time for all good men to come to
the aid of their country. This is just a
regular paragraph.</p>

<p>The quick brown fox jumped over the lazy
dog's back.</p>

<h3>Header 3</h3>

<blockquote>
    <p>This is a blockquote.</p>

    <p>This is the second paragraph in the blockquote.</p>

    <h2>This is an H2 in a blockquote</h2>
</blockquote>
Knowing the usage of markdown is the first step to learning how to create a readme.txt file. Follow this resource for the basics of MARKDOWN’S FORMATTING SYNTAX.
2. Include All Required Readme Header Information
You should add the following pieces of information to a plugin readme header.
Plugin Name: Simply write the unique name of your plugin. Make sure that your given name doesn’t overlap with any existing name available across the WordPress repository. Similar names will create conflicts in the future.
Contributors: Give credit to people who helped you develop the product. This should be a list of WordPress.org usernames. Anything else other than WordPress usernames will appear as a sans profile link with gravatar. Separate each name with a comma.
Note: Some people may want their names to be removed from your readme.txt file. Respect their decisions and omit their names.
Donate link: This part is optional. You can add links to your personal profile or any resource that eventually leads to a payment option.
Tags: Keep your keywords as tags. Separate each tag from the other with a comma. You can put 12 tags at most. Anything beyond that will harm your SEO. It is recommended to keep 5 tags since only the first five will appear on the generated page.
Tested up to: WordPress often releases its improved version. Include the version numbers your product has been tested against in this field. This field should contain only numbers. For example, you should write only ‘6.3’ instead of writing ‘WordPress 6.3’.
Requires PHP: This section is optional. You need to add the minimum PHP version compatible with your plugin. Like the above portion, you need to write only the version number here.
Stable Tag: Write the stable version number of your plugin here. Don’t confuse this number with PHP or WordPress version, it’s specific to your plugin only. You can check the SemVer formatting system to learn how you should write stable tags.
License: All WordPress plugins automatically comply with the terms and conditions of The GNU General Public License. You need to add this information here.
License URL: This is another optional field. Put a link to the resource that contains details about your license. You should add this section if your plugin uses a less familiar license.
Once you are done with the header information, you can move to the next steps- a short and a long description.
3. Write a Concise and Precise Short Description
After the header section, there’s a dedicated section for a short description of your plugin. You can’t use markup in this section. Keep the short description to the point and self-explanatory. The character limit is 150. Anything longer than this limit will get cut off.
4. Keep the Long Description Relevant

This is where you have the liberty to explain what your plugin can do, why people should use it, and other technical details and specifications of your plugin.
Don’t forget to include the key features and unique selling points to attract potential customers. Here are a few tips for writing an effective long description:
- Use markdown to add a variety of formation
- Help the key features stand out from other texts
- Add links to sources where your product was featured on
- Add links to important docs and blogs
- Feature videos if you have any
- Inform users about the upcoming features
- You can include links to your social media or website
Check this example of Dokan Multivendor to see a real-life demonstration of excellent long descriptions.
5. Add Instructions for the Installation Process
Write how people can install your plugin both manually and from the WordPress repository search results. You can skip this if your plugin follows the regular installation process of WordPress. But, this section is a must if your plugin has custom install settings.
6. Include a FAQ Section
Place yourself in the shoes of your users. Try to understand their pain points and what questions they might have about your products. They compile all these questions in this FAQ section. You should include all common questions here.
By the way, only FAQs can’t give answers to all unique problems. So, it’s better to provide support through both WordPress’ support forum and your personal ticketing system.
7. Add Screenshots to Help Users

Screenshots work as the primary threshold of your plugin. You should add real images to help users understand how your plugin looks when it’s in action. These images give hints to the potential users about the UI and UX as well. So, it’s essential to add screenshots to attract users.
8. Provide Additional Information If You Need to
You should include Changelog, Upgrade Notice, and other additional information in this section. Follow the markdown syntax guidelines to present all information correctly. Don’t add information that’s not truly necessary. Users may get distracted and miss out on important information due to overwhelming information.
Example of a Standard Readme.txt File for WordPress Plugin
WordPress.org provides a sample readme file to help everyone generate a well-written readme document. Have a look at the following sample:
=== Plugin Name ===
Contributors: (this should be a list of wordpress.org userid's)
Donate link: https://example.com/
Tags: tag1, tag2
Requires at least: 4.7
Tested up to: 5.4
Stable tag: 4.3
Requires PHP: 7.0
License: GPLv2 or later
License URI: https://www.gnu.org/licenses/gpl-2.0.html

Here is a short description of the plugin.  This should be no more than 150 characters.  No markup here.

== Description ==

This is the long description.  No limit, and you can use Markdown (as well as in the following sections).

For backwards compatibility, if this section is missing, the full length of the short description will be used, and
Markdown parsed.

A few notes about the sections above:

* "Contributors" is a comma separated list of wordpress.org usernames
* "Tags" is a comma separated list of tags that apply to the plugin
* "Requires at least" is the lowest version that the plugin will work on
* "Tested up to" is the highest version that you've *successfully used to test the plugin*
* Stable tag must indicate the Subversion "tag" of the latest stable version

Note that the `readme.txt` value of stable tag is the one that is the defining one for the plugin.  If the `/trunk/readme.txt` file says that the stable tag is `4.3`, then it is `/tags/4.3/readme.txt` that'll be used for displaying information about the plugin.

If you develop in trunk, you can update the trunk `readme.txt` to reflect changes in your in-development version, without having that information incorrectly disclosed about the current stable version that lacks those changes -- as long as the trunk's `readme.txt` points to the correct stable tag.

If no stable tag is provided, your users may not get the correct version of your code.

== Frequently Asked Questions ==

= A question that someone might have =

An answer to that question.

= What about foo bar? =

Answer to foo bar dilemma.

== Screenshots ==

1. This screen shot description corresponds to screenshot-1.(png|jpg|jpeg|gif). Screenshots are stored in the /assets directory.
2. This is the second screen shot

== Changelog ==

= 1.0 =
* A change since the previous version.
* Another change.

= 0.5 =
* List versions from most recent at top to oldest at bottom.

== Upgrade Notice ==

= 1.0 =
Upgrade notices describe the reason a user should upgrade.  No more than 300 characters.

= 0.5 =
This version fixes a security related bug.  Upgrade immediately.

== A brief Markdown Example ==

Markdown is what the parser uses to process much of the readme file.

[markdown syntax]: https://daringfireball.net/projects/markdown/syntax

Ordered list:

1. Some feature
1. Another feature
1. Something else about the plugin

Unordered list:

* something
* something else
* third thing

Links require brackets and parenthesis:

Here's a link to [WordPress](https://wordpress.org/ "Your favorite software") and one to [Markdown's Syntax Documentation][markdown syntax]. Link titles are optional, naturally.

Blockquotes are email style:

> Asterisks for *emphasis*. Double it up  for **strong**.

And Backticks for code:

`<?php code(); ?>`
Since WordPress.org recommends this sample readme.txt, you can follow it meticulously. The plugin review team will approve your plugin if you can imitate the sample perfectly.
Learn How to Upload Your Plugin to WordPress Repository
Use a WordPress Readme Generator Tool to Avoid Hassles
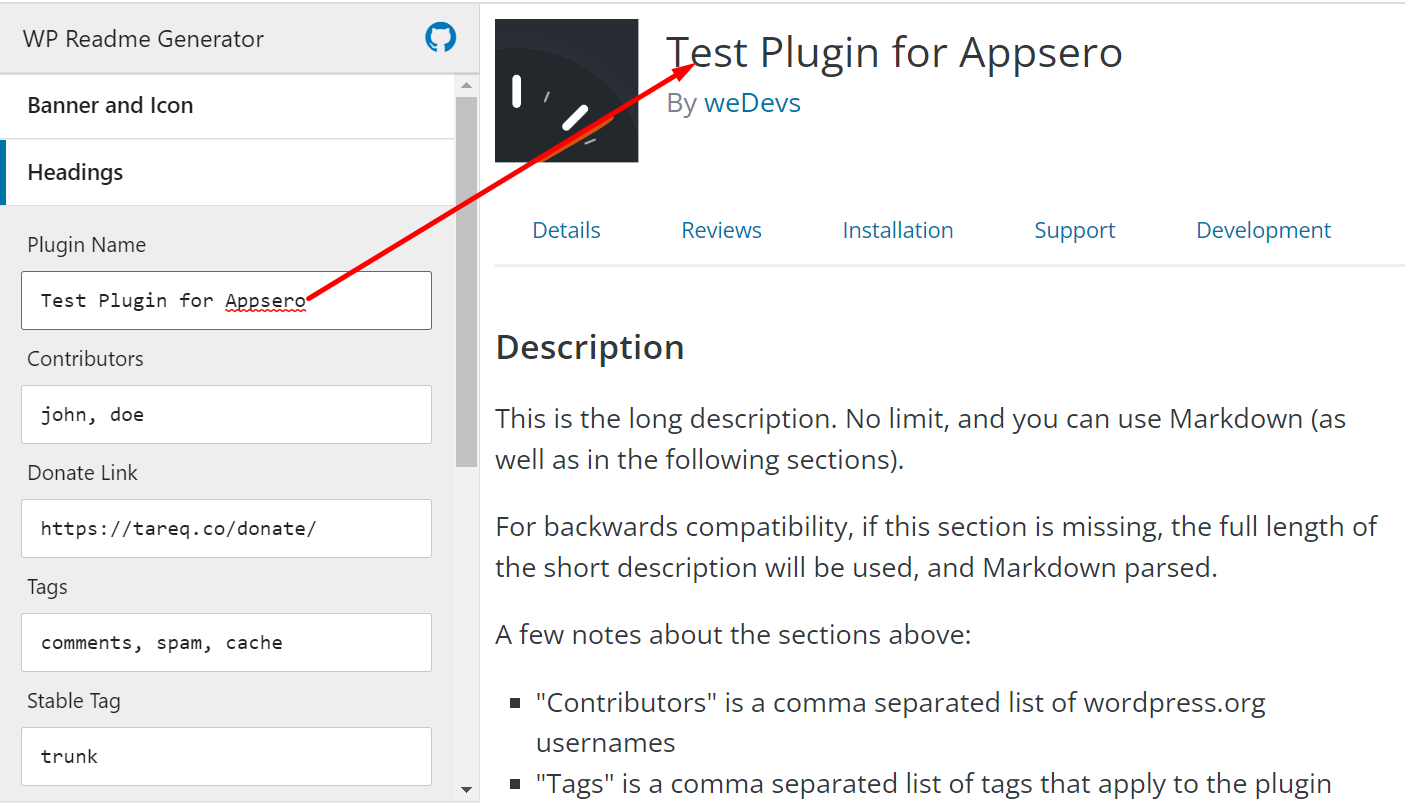
The fun of working with WordPress is that you can do almost everything with the help of a tool. It has tools for almost everything. The case is no different for readme.txt as well. There are many useful readme generator tools out there. You can use WP Readme Generator by weDevs to create a readme.txt file for your plugin.
The tool is very easy to use. Choose the option from the left sidebar. Each option will expand specific input fields for you. Then write your content there. You’ll see the real-time output on the screen. See the next image for an example.
You can import and export your readme.txt file using this tool developed by weDevs. I came across another useful tool that can help you. You can use GenerateWP Readme Generator as well if you want to create an excellent readme document for your product.
Once you are done with writing a readme.txt, check if it’s okay and complies with the standard WordPress practices. Validate your plugin either using a URL or by pasting your text into the text box.
Bonus Tips – How to Optimize Your WordPress Plugin for SEO

Other than the usual keyword and slug things, WordPress.org considers a few more factors while ranking a plugin. Keep your support threads active, meaning that resolve issues as soon as possible when they come.
Check the following actionable tips to improve your ranking across the WordPress repository and Google.
- Include keywords in your plugin name
- Push regular updates (even if it’s a minor update)
- Keep your plugin compatible with the latest WordPress & PHP versions
- Choose tags that match your target keywords
- Insert relevant keywords in FAQ (whenever possible)
- Try to improve your product’s average rating
- Onboard more active users (active installations affect ranking)
- Write a complete readme.txt that has the right keywords
We’ve also prepared a complete SEO Guide for WordPress Developers. You can read it for more insights into WordPress SEO.
How to Get a Good Average Rating for Your Plugins (Only for Beginners)
Like you, I also thought about how I achieved a good rating initially just after deploying my product. Every problem comes with a solution. You can reach out to your friends, colleagues, and family members who are involved in WordPress. Ask them to use your plugin and leave 5-star reviews.
It will provide you with the initial boost. You’ll fail in the long run if your product lacks quality. These back-door reviews bring good results during the initial stage only. It’s not possible to sustain your plugin in the market depending solely on black hat techniques.
Final Thoughts
So this is all you need to know before creating an Effective Readme.txt File for WordPress.
We believe the aforementioned steps, best practices, and tips are going to help you make your plugin readable to search engines even better.
If you have any questions or further queries, don’t forget to let us know in the comments section. Cheers!
Subscribe To Our Newsletter
Don’t miss any updates of our new templates and extensions
and all the astonishing offers we bring for you.


I blog quite often and I truly appreciate your content. The article has really peaked my interest. I will take a note of your website and keep checking for new information about once a week. I subscribed to your Feed as well.
Thanks Irving for your appreciation.