How to Upload Plugin to WordPress Repository: Step by Step Guide for First-Timers
There is a set of rules to add plugins to WordPress repositories like WordPress.org. Not following the proper guideline, or knowing how to upload plugin to WordPress repository, you can end up the journey unsuccessful.
You need to create a checklist of what you should follow and what you should avoid. Violating any of the community rules can make your plugin inaccessible to your end-users. What’s the meaning of creating a great plugin if your target audience can’t even know about it? All your hard work will go in vain, right?
So, if you’re planning to upload your first-ever plugin to the repository, stick to this ultimate guide. In this tutorial, we are going to show you the full journey of how to prepare, upload, and publish a plugin to the repo.
But before that let’s discuss a bit what you’ll get if you add plugins to the WordPress repository.
Benefits of Publishing Your Plugin to WordPress Repository

The WordPress plugin directory is a go-to place for all WordPress enthusiasts. With more than 60 thousand free plugins, it’s the best reliable source to find and download a WordPress plugin. As a result, the WordPress repository gets millions of traffic per month.
So, by uploading your plugin here, you can get this much attention without paying a single penny, as the WordPress repository doesn’t cost you to host your plugin.
You don’t have to worry about tracking how many people are using your plugin. The directory will automatically track it for you and let your users know if you release any updates.
Also, the directory enables your users to rate your plugin and leave feedback about it. They can make use of the support forum for bug reporting so that you can keep updating your plugin as per your users’ needs.
Last but not least if you have a plan to sell the premium version of your plugin, you don’t have to create a different marketing campaign to announce it. As you can put a link back to your site from the repository and users who visit your site through the link will automatically know about the premium features and pricing.
5 Steps to Upload and Publish Your First Ever Plugin to WordPress Repository
Adding plugins to the WordPress repository is a 5 steps process. Take a quick look at the list first.
- Step 0: Get a Clear Idea of Plugin Structure
- Step 1: Follow the Community Guidelines
- Step 2: Set a Unique Plugin Name
- Step 3: Validate the Readme File
- Step 4: Submit Your Plugin for Approval
- Step 5: Store Your Plugin in WordPress Subversion (SVN) Repository
Now we will discuss each of the above-mentioned points in details so that you can get a clear idea of how this process works.
Step 0: Get a Clear Idea of Plugin Structure
Your plugin will be stored in the WordPress.org SVN repository. Anyone will be able to check out a copy, but only the author will have the privilege to edit it.
Once you’ve published a plugin, you can add new files, and edit or delete existing files on your local machine, then upload these changes to the server.
All changes are tracked by the subversion so that you’ll be able to get back to old versions or revisions later.
The SVN repositories provide four default folders:
/assets/
/branches/
/tags/
/trunk/
If you are wondering how these folders work, here is the explanation:
- Assets folder stores all the screenshots, headers, and icons.
- Trunk folder is the directory where you’ll put the plugin files.
- Branches folder is used to store divergent branches of code.
- Tags folder is there to store plugin releases.
Step 1: Follow the Community Guideline

There is a proper guideline on how your plugin should be to get approval from the WordPress repository. Save your time and money by reading the detailed guidelines before creating and submitting your plugin. Make sure that you’re in compliance with all of these rules.
Some of the significant rules are as follows:
- Make sure your plugin is GPL compatible
- Ask user consent before storing user information
- Not spamming users
- Not doing anything that is illegal or morally offensive
- Not embedding external links on the public site.
Step 2: Set a Unique Plugin Name
Go to wordpress.org/plugins and enter your desired plugin name into the “Search plugins…” input.
If no plugins exist with that name, there’s still a chance that a plugin has been submitted under that name and the user just hasn’t submitted their first Subversion commit; so don’t get too excited. You need to submit your plugin as soon as possible in order to guarantee that you get the name.
If the plugin name exists, you’ll need to brainstorm to get a new one.
Step 3: Validate the Readme File

The ReadMe file is used to populate your plugin’s WordPress Plugin Directory page. You need a readme.txt file with the following information:
- Plugin name
- Contributors: (a list of wordpress.org author ids)
- Donate link: http://example.com/
- Tags: (plugin tags)
- Requires at least: (WordPress version)
- Tested up to: (WordPress version)
- Stable tag: (plugin version)
- License: GPLv2 or later (or compatible)
- License URI: https://www.gnu.org/licenses/gpl-2.0.html
- Description
- Installation
- Screenshots
- Changelog
After adding that information, you should add the main description, installation instructions, frequently asked questions, and screenshots of your plugin.
Make sure to include the screenshots, banner, and icon in your plugin’s assets directory. The more screenshots the better. Once you’re happy with your readme file, run it through the ReadMe Validator. You’ll get notified if there is an error in your file.
Here is an example of how your readme file looks like.
=== Your Plugin Name ===

Contributors: Your WordPress.org Username
Tags: Your plugin tag
Requires at least: 5.5
Tested up to: 5.8
Stable tag: 1.0
License: GPLv2 or later
License URI: http://www.gnu.org/licenses/gpl-2.0.html

A WordPress plugin to teach beginners how to write a WordPress plugin.

== Description ==

This simple plugin is part of our beginner's guide to writing a WordPress plugin.

== Installation ==

1. Upload the plugin folder to your /wp-content/plugins/ folder.
1. Go to the **Plugins** page and activate the plugin.

== Frequently Asked Questions ==

= How do I use this plugin? =

Answer to the question

= How to uninstall the plugin? =

Simply deactivate and delete the plugin.

== Screenshots ==
1. Description of the first screenshot.
1. Description of the second screenshot.

== Changelog ==
= 1.0 =
* Plugin released.
Finally, you should right-click on your plugin folder and create a zip file. Mac users should select ‘Compress plugin name’ and Windows users can select ‘Send to » Compressed (zipped) folder’.
Step 4: Submit Your Plugin for Approval
If you have successfully completed the above part, now it’s time to submit your plugin to the repository for approval. To do that you need to create an account there.
- Visit here to open your account if you already don’t have an account.
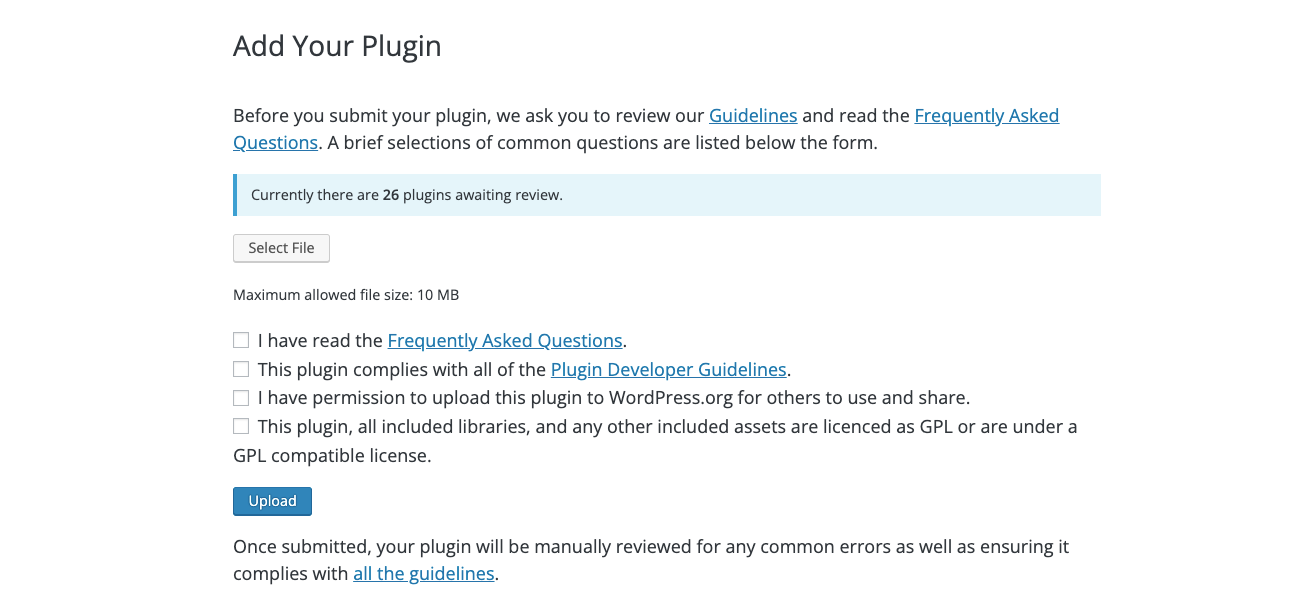
- Then go to Add Your Plugin to upload your plugin.
- Simply, click the Select File to upload the zip file. Tick all the checkboxes and click the Upload button to finish this process.
The WordPress.org plugin review team will then take a look at your plugin code for common errors and security checks. Once approved, you’ll receive an email from the plugins team.
This email will contain a link to the Subversion (SVN) repository where your plugin will be hosted on WordPress.org. You will need to use this link when you upload your plugin.
Step 5: Store Your Plugin in WordPress Subversion (SVN) Repository
Subversion is a version control tool that allows you to track all of the changes so that you can go back and look at old versions or revisions later if you ever need to. If you’re familiar with Git (another version control system), you’ll pick this up very quickly.
Now that your plugin has been approved, it’s time to store a copy in your WordPress Subversion repository. This repository is where your plugin files are stored. Anyone can get a copy of your plugin files from the repository, but the contributors listed in your readme file are the only ones that can make changes to your plugin’s repository.
Here we are going to show you how to store a plugin in the WordPress SVN repository as a MAC user.
We’re going to be storing your plugin in the WordPress Subversion repository using the command line. Open up your Terminal application. Find the parent directory where you want your plugin to live.
- Use the cd ‘directory name’ command to open a directory.
- Use the cd .. command to move out of the current directory and into its parent directory.
- Use the ls -a command to list all of the files and directories in the current directory.
When you have navigated to the parent directory, run the command below through your terminal window.
$ svn co https://plugins.svn.wordpress.org/your-plugin-name appseroThis command adds all of your central WordPress Subversion repository’s files into your local repository. Replace https://plugins.svn.wordpress.org/your-plugin-name with the URL that is provided in your plugin approval email.
And, replace appsero at the end of the command with what you would like to name the directory. You’ll get a response asking the following:
(R)eject, accept (t)emporarily or accept (p)ermanently? Type in t or p and hit Enter. Then, you’ll receive the message below. This indicates that the appsero directory was created on your computer and the tags, assets, trunk, and branches directories were added within the appsero Subversion repository directory.
A    appsero/tags
A    appsero/assets
A    appsero/trunk
A    appsero/branches
Checked out revision 111111.
Place all of your plugin files in the trunk directory. Now that you have your plugin files in the trunk directory, you need to add those files to your Subversion repository so that they can be tracked. You can do this by running the terminal command below.
$ svn add trunk/*You then need to push the changes made to your local repository to the central WordPress repository by running the following command in your terminal window.
$ svn ci -m 'First plugin version'You’ll need to enter your computer’s logged-in username and password.
Then, you will be asked for your WordPress username and password.
Once those credentials are provided, your plugin’s files will be transferred to the WordPress central repository.
We still haven’t uploaded any images to our plugin. To do that you have to add images to the assets directory. Then, run the following terminal command
$ svn add assets/*Now, you need to commit the change to the central repository.
$ svn ci -m 'Assets upload'Check out your WordPress Plugin Directory page now and you should see all are done. So, congratulations, you have completed the whole process.
If you are developing your plugin on multiple computers or with multiple contributors, make sure to run the update command (visible below) before committing any changes.
$ svn upThis pulls the changes that exist in the central WordPress repository into your local plugin repository.
Also Read: How to Promote Your WordPress Plugins and Themes Effectively
How to Upload Plugin to WordPress Repository- FAQ(s)
How do I add a plugin to a WordPress repository?
Step 0: Get a Clear Idea of Plugin Structure
Step 1: Follow the Community Guideline
Step 2: Set a Unique Plugin Name
Step 3: Validate the Readme File
Step 4: Submit Your Plugin for Approval
Step 5: Store Your Plugin in WordPress Subversion (SVN) Repository
What is a WordPress plugin repository?
A plugin repository is a store where plugins can be stored and managed. It can be both free and premium. Example of a free plugin repository is WordPress.org and a premium plugin repository is codecanyon.
Is WordPress plugin repo free?
Yes, the most popular WordPress plugin repository – WordPress.org is completely free. You can upload your plugin there without any cost. Also, as a general user, you can download any plugin from there without paying any penny.
Wrapping up
So, this is the whole process to upload a plugin to the WordPress repository. Now you should be ready to publish your first-ever plugin there.
Start promoting your plugin, once you have successfully published it to the repo. So that you can reach out to your target customer and people can know about your great product.
If you face any complications while uploading your plugin, you can let us know through the comment box below. We would love to help you out. Good luck!
Subscribe To Our Newsletter
Don’t miss any updates of our new templates and extensions
and all the astonishing offers we bring for you.

It’s nearly impossible to find well-informed people for this topic, however, you seem like you know what you’re talking about! Thanks
Your thoughtful feedback is truly valued and it encourages us to keep sharing valuable content.
What about the further deployments? If we plan to connect our Github repository to the WordPress SVN as you described, and setup a CI for doing those things – are we able to control the plugin version by our Github Repository? I see you described very well the steps from development to the publishing, but I don’t know if that’s intuitive the WP requirements for releases.
Thank you for your comments on our blog post! Your feedback means a lot to us and encourages us to keep writing. We appreciate your engagement and support.