How to Integrate Appsero SDK: 2 Effective Ways to Enable WordPress Analytics
Managing WordPress projects effectively requires a comprehensive solution that enables analytics, licensing, and streamlined product management. You’ll find only a few solutions that simplify these tasks. Here comes Appsero into the scene which empowers you to optimize your projects and make data-driven decisions.
Whether you’re a WordPress developer or a product owner, Appsero provides the tools and insights you need to succeed in the ever-evolving WordPress ecosystem. And, you need to integrate the Appsero SDK into your project to unlock a wide range of WordPress analytics.
Appsero SDK works as a powerful toolkit that ensures you have access to accurate analytics data, enhanced security, and the ability to make informed decisions. In this tutorial, we’ll show you how you can integrate your Appsero SDK manually using Composer and Git. Before that, let’s learn why Appsero needs an SDK.
Quick navigation:
- What is an SDK (Software Development Kit)?
- Why does Appsero need an SDK?
- Why you should integrate Appsero SDK
- How to integrate Appsero SDK using Composer and GitHub
- Why it’s important to keep the Appsero SDK up to date
- Contact the support team when required
- Use Appsero to manage your next WordPress project
What is an SDK (Software Development Kit)?
SDK stands for Software Development Kit. It is a collection of tools, libraries, documentation, and resources that software developers use to create applications for a specific software platform, operating system, or framework.
SDKs provide pre-built components and functionalities that simplify the development process. This allows developers to focus on building specific features or functionalities rather than starting from scratch.
SDKs typically include APIs (Application Programming Interfaces) that define how software components should interact with each other. Technology companies, operating system vendors, or third-party developers provide an SDK to support the development of applications for their platforms or services. Likewise, Appsero also provides an SDK for its users.
Why does Appsero need an SDK?
When you manage a project using Appsero, it uses Appsero SDK to collect some telemetry data upon the user’s confirmation. The SDK doesn’t store any sensitive data. The tracked data include server environment details (PHP, MySQL, server, WordPress versions), number of users, site language, number of active and inactive plugins, and more.
With Appsero’s analytics capabilities, you gain valuable insights into user behavior, performance metrics, and conversion rates. This data-driven approach helps you identify areas for improvement, make informed decisions, and enhance the overall user experience.
However, Appsero SDK does not gather any data by default. It only starts gathering data when a user allows it via the admin notice. We collect the data to ensure a great user experience for all our users. Learn more about how Appsero collects and uses this data.
Why you should integrate Appsero SDK
Appsero provides a centralized dashboard that allows you to effortlessly add and manage your WordPress projects. And, the SDK adds up to its analytics functionalities. Let’s explore what benefits Appsero offers through an SDK.
- Real-time analytics: Appsero provides real-time analytics data, giving you instant insights into user activities, product performance, and customer behavior.
- Conversion tracking: Appsero enables you to track conversions, identify trends, and make data-driven decisions to optimize your conversions.
- Data visualization: It offers visualized data in easy-to-understand charts, graphs, and dashboards. These visual representations help you gain actionable insights quickly.
- Customer language preferences: Appsero helps you determine which languages are most commonly spoken or preferred by your target audience.
- Product usage data: The SDK helps Appsero collect plugin and theme usage data like the list of themes from where your plugins are getting uninstalled the most. It also lets you know the names of the most used plugins along with your plugin.
How to integrate Appsero SDK using Composer and GitHub
Since you’re going to integrate the Appsero SDK, we assume that you already have an account on Appsero. The first step to managing your project with Appsero is adding it using the Appsero dashboard. Learn all the steps from the below section.
1. Log in to the Appsero dashboard
Log in to your Appsero dashboard by providing the credentials. It will take you to the page from where you can add new projects, including plugins, themes, and bundles to your Appsero account. This dashboard works as the central point of operations for all your activities.
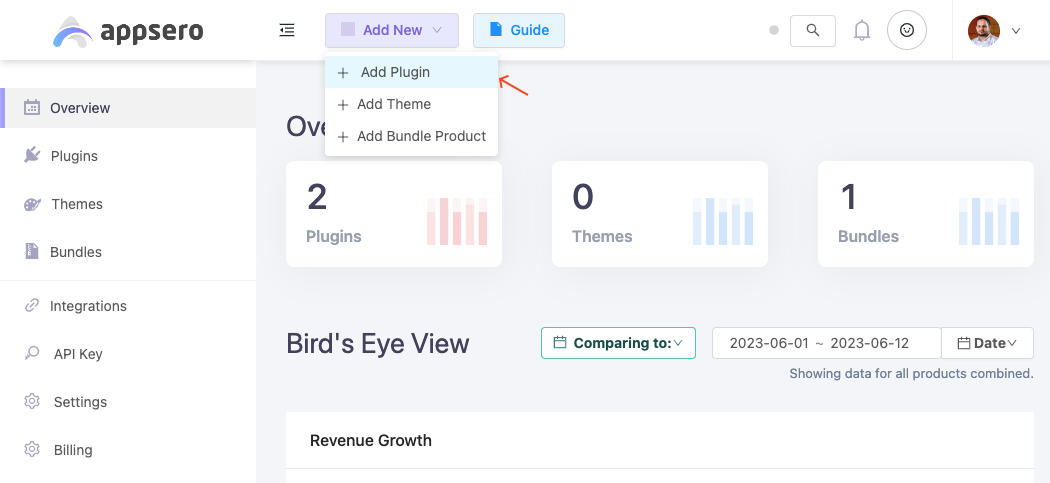
2. Add your WordPress project
Hover on the Add New button from the top bar. It will expand the options for you. Click on the Add Plugin button.
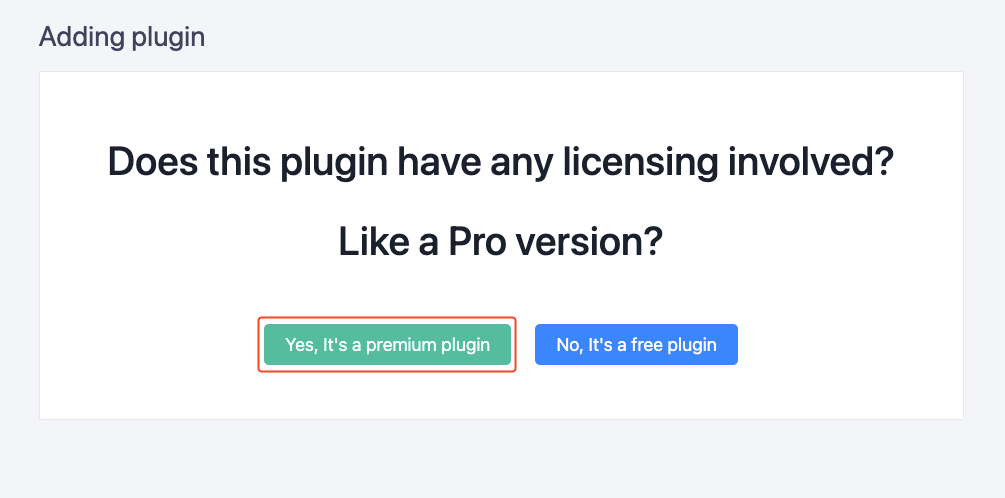
Then choose whether you’re going to sell a premium plugin or a free plugin using Appsero. We chose the premium option since a free version doesn’t require licensing functionalities.
Provide all necessary information needed for a plugin, such as a name, slug, software version, PHP version, WordPress version, and more.
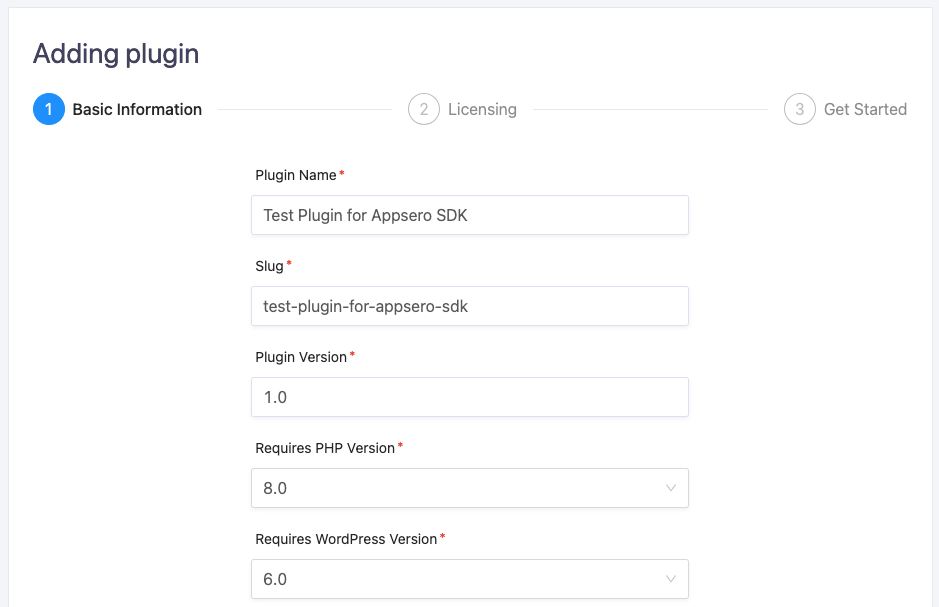
Then hit the “Next” button to move forward to the licensing stages.
3. Configure the licensing options
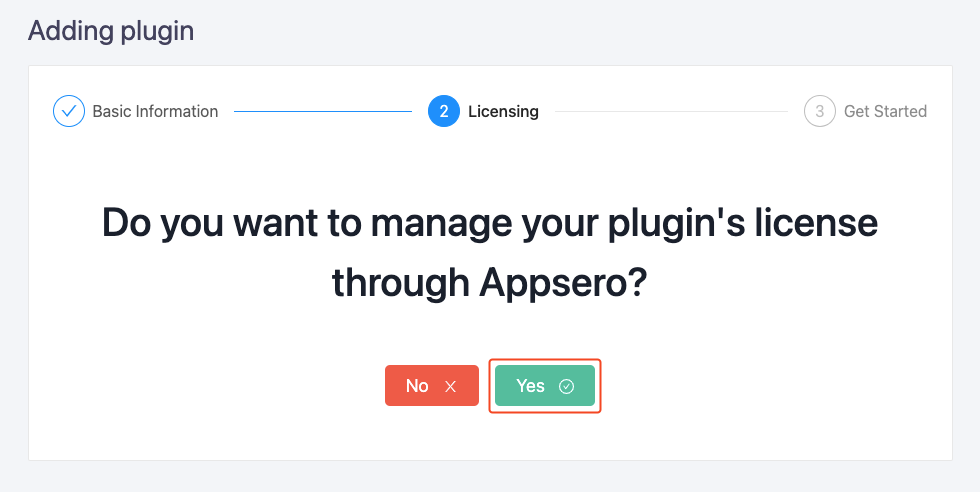
Here, you’ll be asked if you want to manage your plugin’s license through Appsero. Click on Yes to move ahead with the licensing options.
We’ll show you how you can manage licenses with Appsero as a beginner. Let’s start from scratch and choose ‘I don’t use any of them‘ in this step.
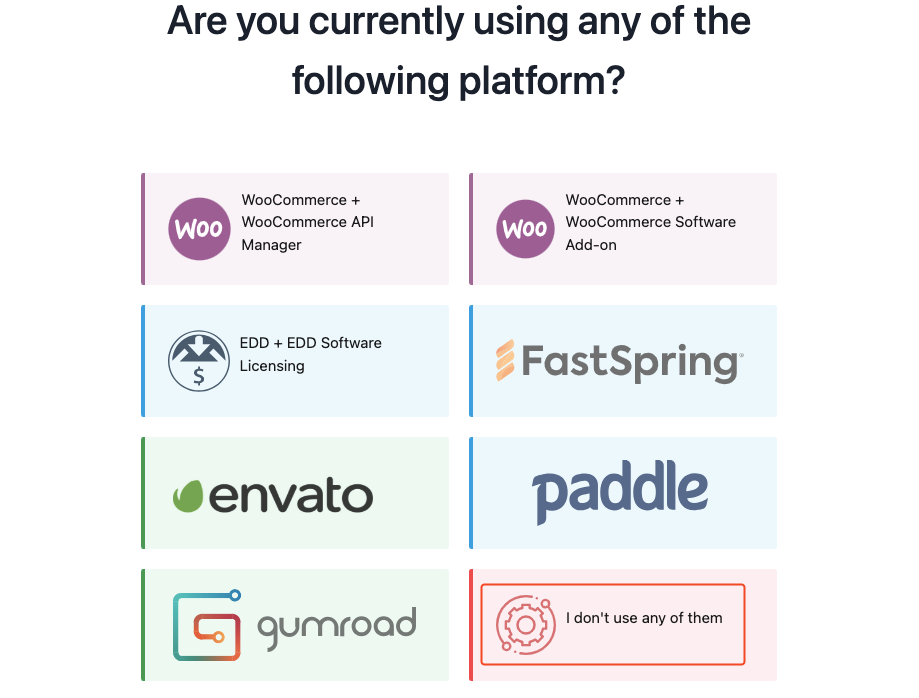
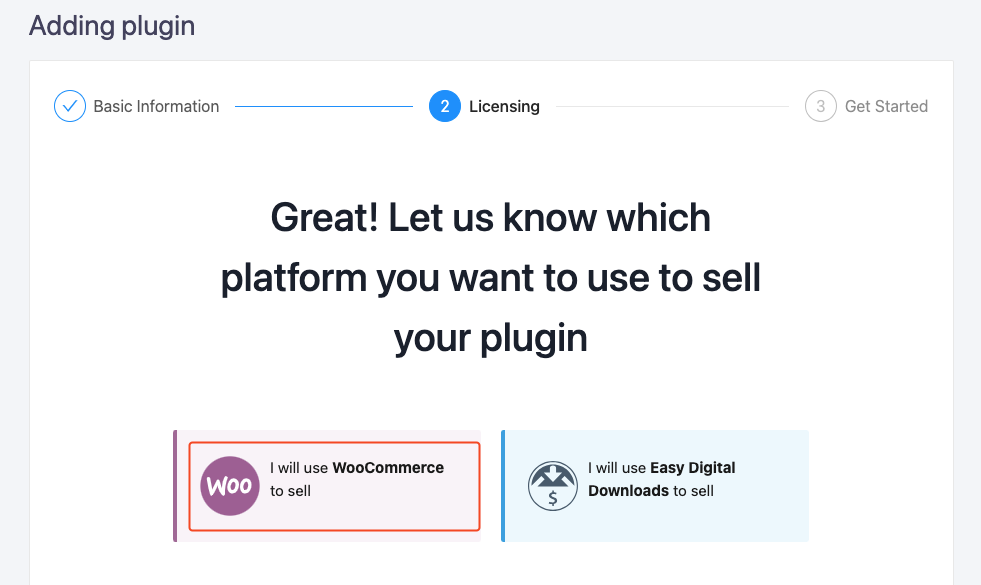
You can manage your licenses with Appsero but you need a selling platform to allow your potential customers to buy the product. Appsero integrates perfectly well with WordPress platforms like WooCommerce, Easy Digital Downloads (EDD), and SaaS solutions like FastSpring, Paddle, and Gumroad. We chose WooCommerce for this tutorial. The steps are pretty much similar for EDD as well.
The next step will ask you if you want to manage the licensing with Appsero. We recommend using Appsero to do everything regarding licenses including license generation, license checking, enforcing license activation limits, etc). Appsero will automatically sync existing licenses from EDD or WooCommerce.
4. Complete the product mapping
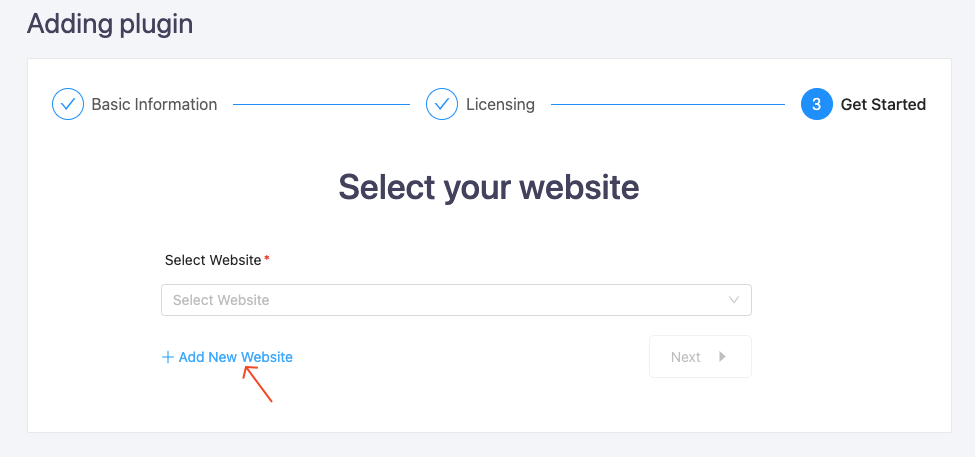
Now, it’s time to add a website and a product to your Appsero license management system. You can choose from the already connected websites or choose a new website by clicking on “Add New Website”.
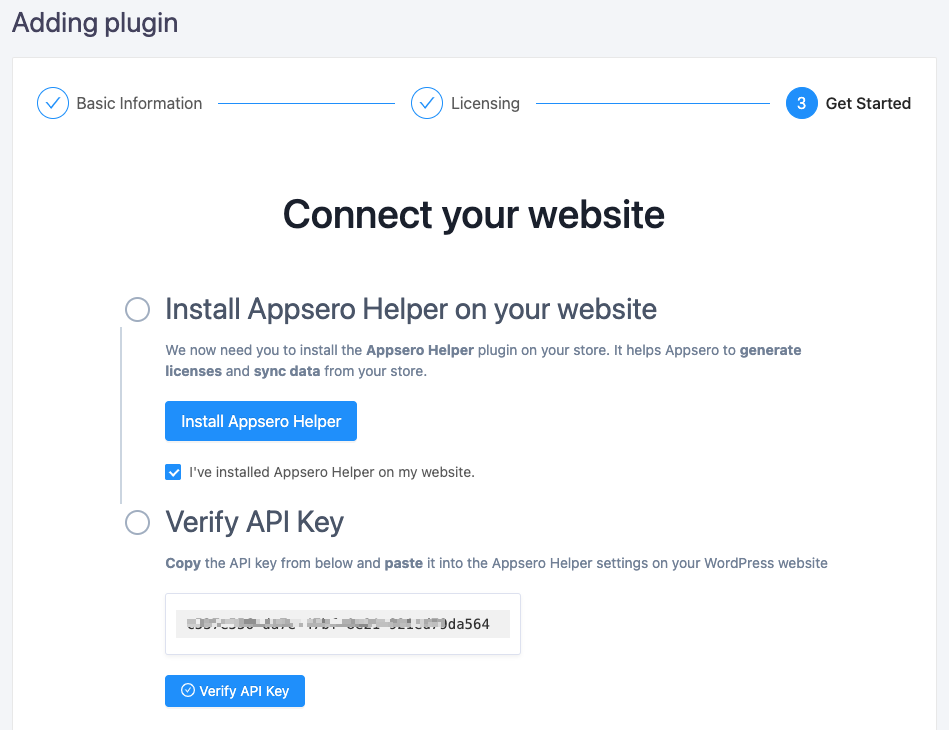
Then, you need to install the Appsero Helper plugin on your website. It allows Appsero to generate licenses and sync data from your store. Once you have the helper plugin installed on your website you need to copy and paste the API key provided by Appsero to the designated place inside the plugin settings option.
Also read: How to install a WordPress plugin
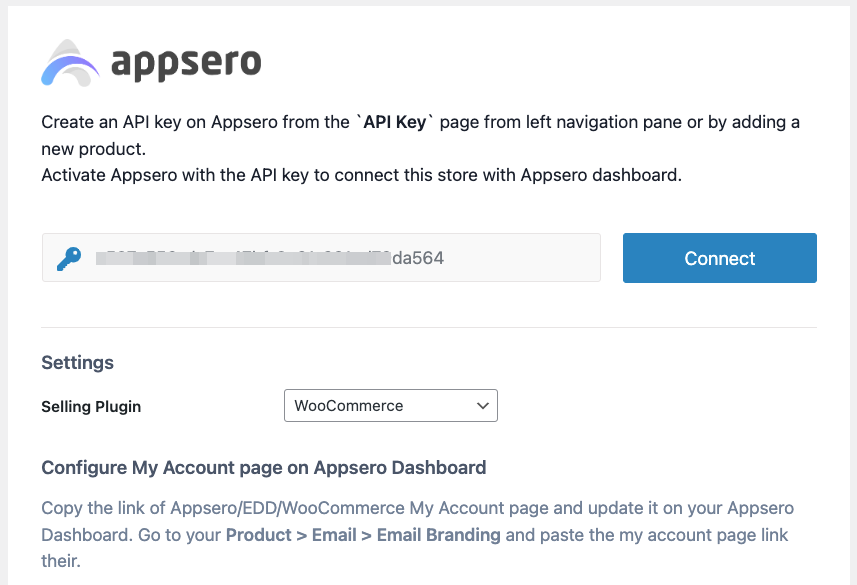
Navigate to the Settings section of your WordPress admin panel and open the Appsero Helper submenu. You’ll get a placeholder to paste the API here. Click the Connect button to build a bridge between Appsero and your website. You can also choose the selling plugin you’re using from this section.
Now, you need to go back to Appsero again and verify the API you’ve just used in the above. Click on Verify API Key, it will show a success notification as the following image:
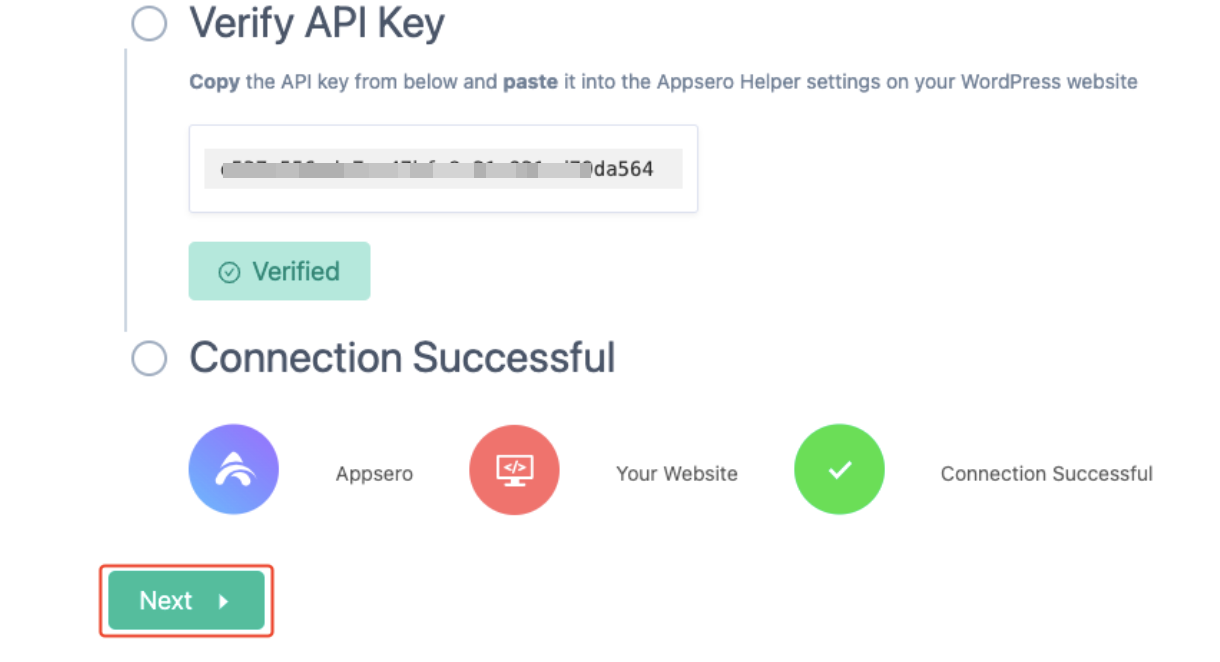
Upon successful connection, you can finally add your website and choose the product you want to sell through Appsero from this step. Simply choose your options from the dropdown menus.
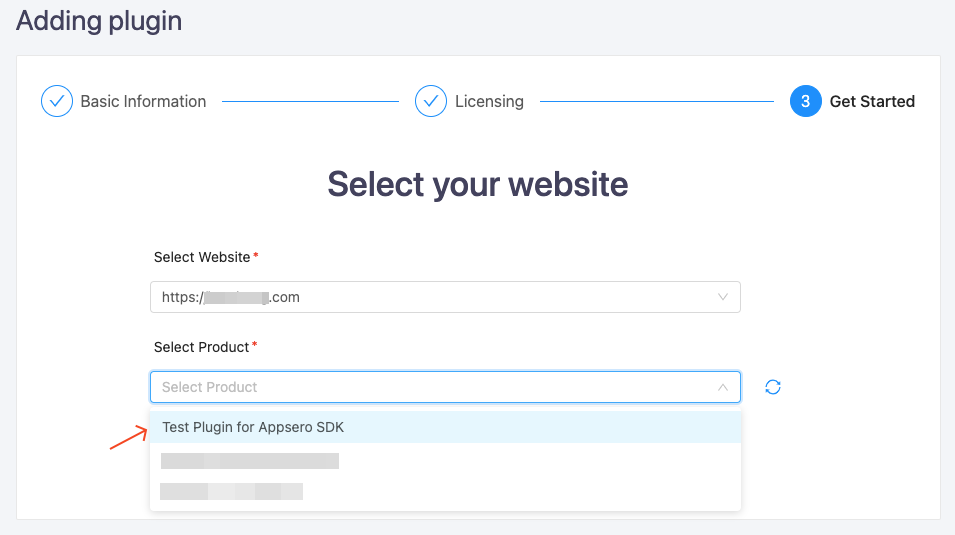
Note: Since this step will connect your online store with Appsero, make sure you have the product ready on the website beforehand. Otherwise, the product mapping will not be complete.
5. Integrate Appsero SDK to collect analytics
Here comes the most important part of this tutorial. You need to integrate Appsero SDK with your product to get a wide range of analytics data. This SDK lets Appsero collect non-sensitive diagnostic data and usage information.
You can add SDK to your project in two methods, using Composer or GitHub. We’ll show both ways in the following sections. Let’s learn how you can complete the process successfully.
I. SDK integration with Composer
We provide the required code snippet in the installation process and also a detailed guide about Appsero Client is available in our documentation section.
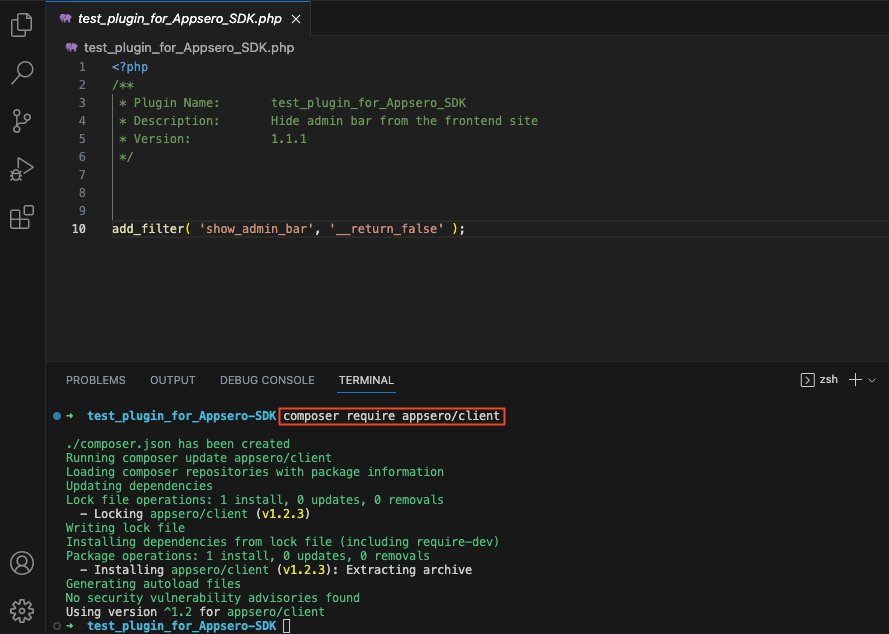
Open your project’s folder with a code editor like Visual Studio. Select your main PHP file and open the terminal. Copy the following code snippet and paste it on the terminal.
composer require appsero/clientYou can also follow the instructions given in our installation method.
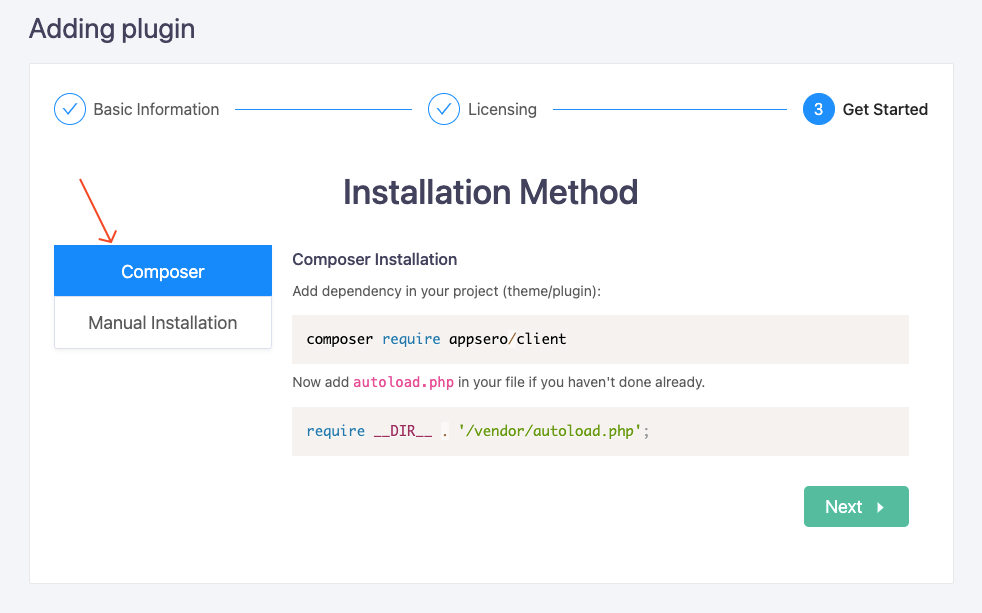
Let’s see how it goes when we paste the code snippet.
Then add the autoloader.php file to your plugin. Use the following snippet to do so.
require __DIR__ . '/vendor/autoload.php';After that, hit the next button on Appsero’s installation window. Here you will get the customized code snippet for the project that you’re going to manage.
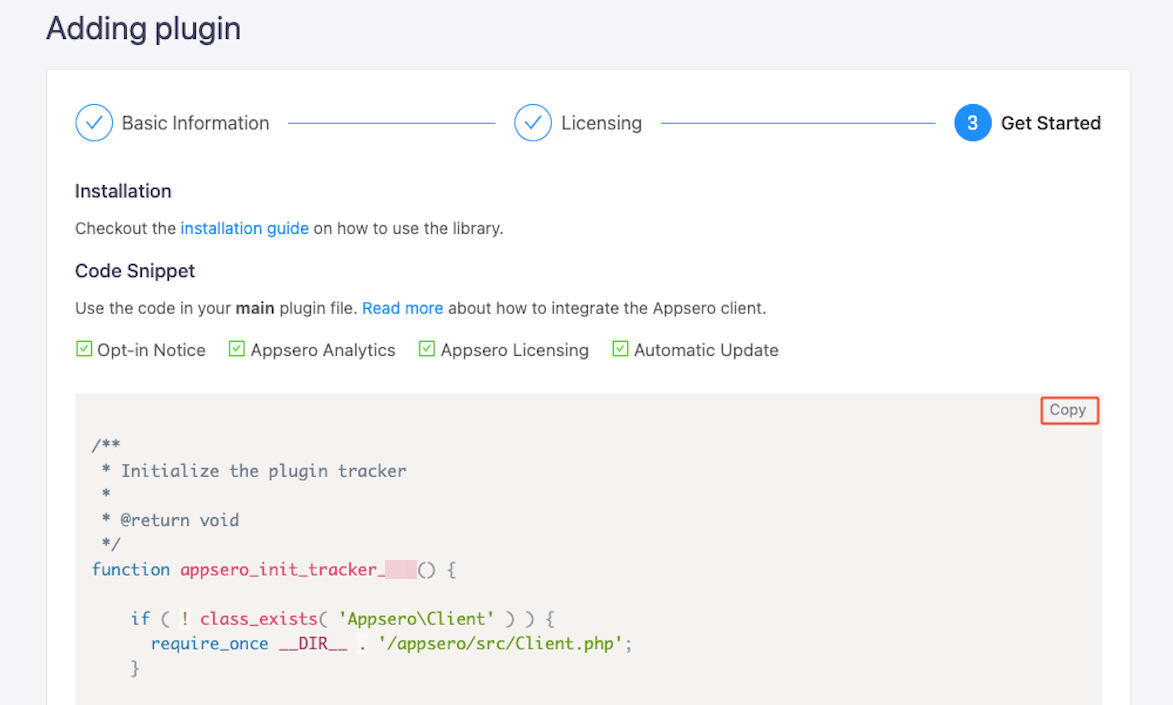
Copy that snippet and paste it just under require __DIR__ . ‘/vendor/autoload.php’;.

You’re done! This code snippet will initiate the plugin tracker and now you can fetch analytics data through this SDK.
Your project folder should include a few files along with a vendor sub-folder as shown below.
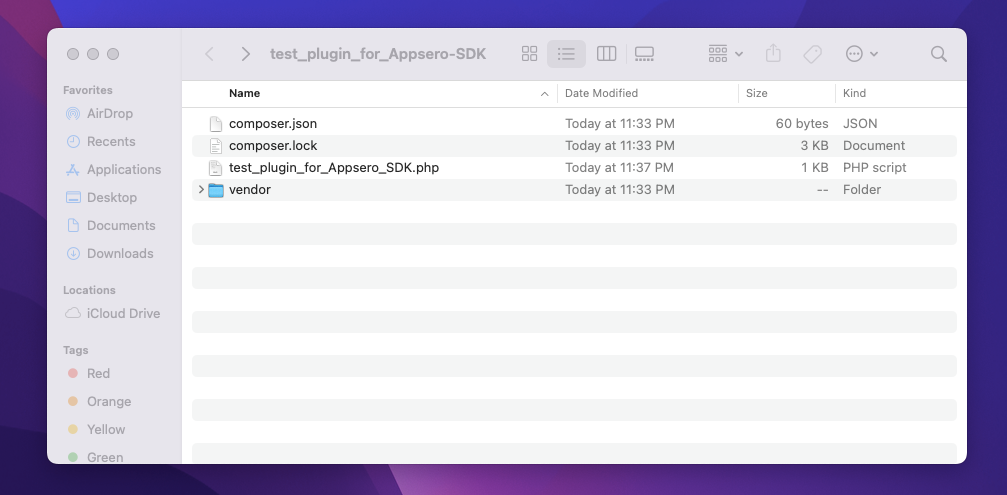
Compress the whole folder into a ZIP file. Your plugin is ready to sell, upload, and use.
II. SDK integration with GitHub
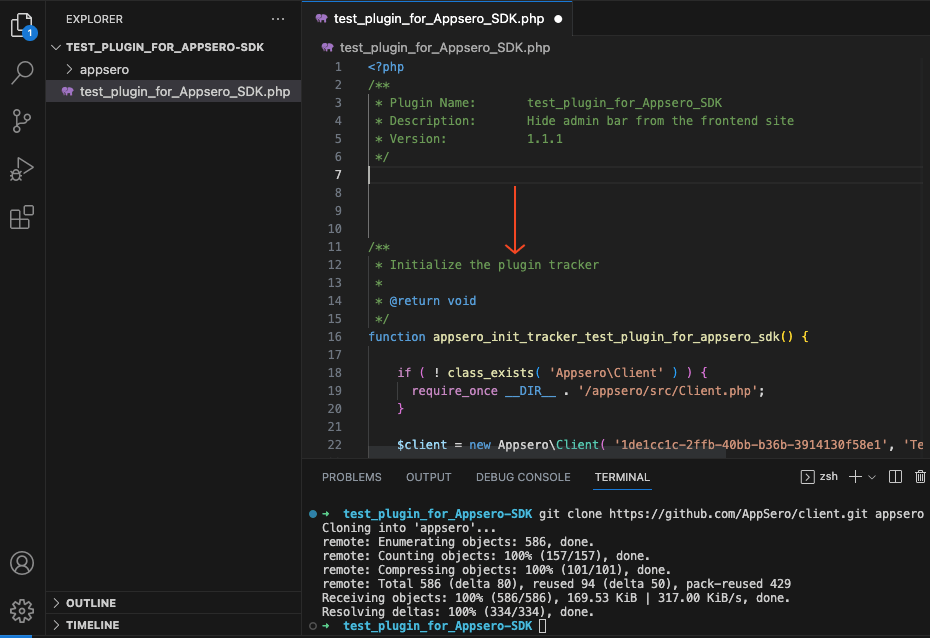
Let’s integrate the SDK through GitHub in this step. Simply go to your project’s folder as before. Open the PHP file and the terminal. Copy the code snippet provided by Appsero.
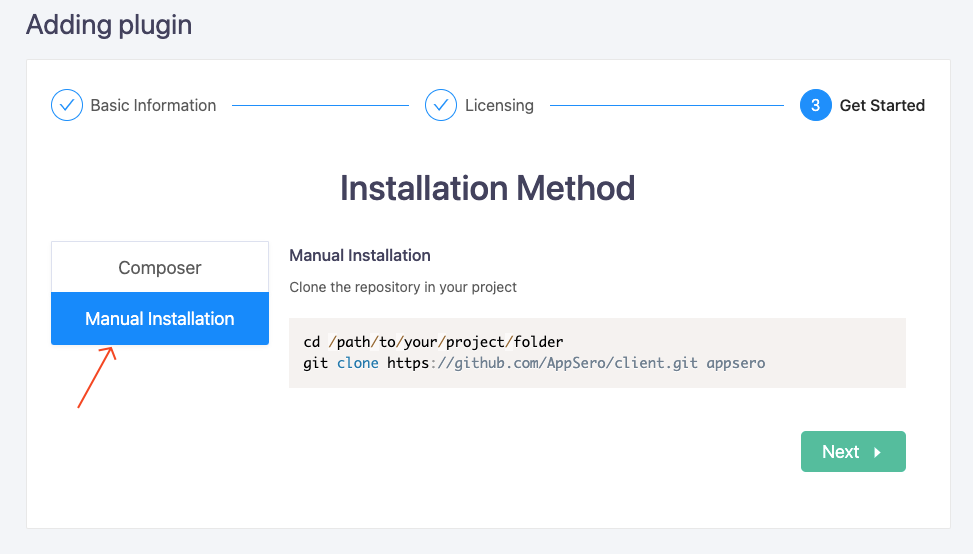
Copy the following snippet and paste it on the terminal.
git clone https://github.com/AppSero/client.git appseroIt will render the necessary information directly from GitHub.
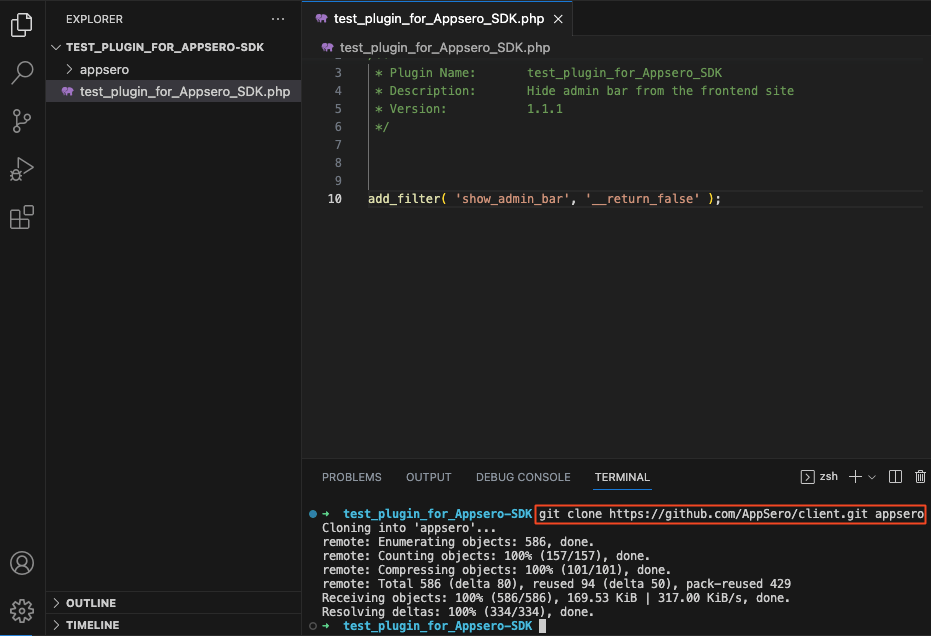
Then move on to the next step, copy the customized code snippet and paste it inside the main PHP file as shown below.
Done! Compress all elements of the folder in a ZIP file as shown in the above section. Then, you can use the plugin for further steps.
Important!
You’ll see an additional part at the end of the SDK integration step. It has a link to the detailed guide on how you can use the SDK to enhance Appsero’s capabilities along with a privacy policy written in markdown format. Click on More Usage for the documentation. Copy the privacy policy and add it to your readme file to comply with WordPress.org guidelines.

Also read: How to create a Readme.txt file
6. Test your product on a staging site
Before making the product available for everyone, we recommend using it on a staging site. Upload the ZIP file to your website and activate the plugin. Check if it shows a notification message like the following one:
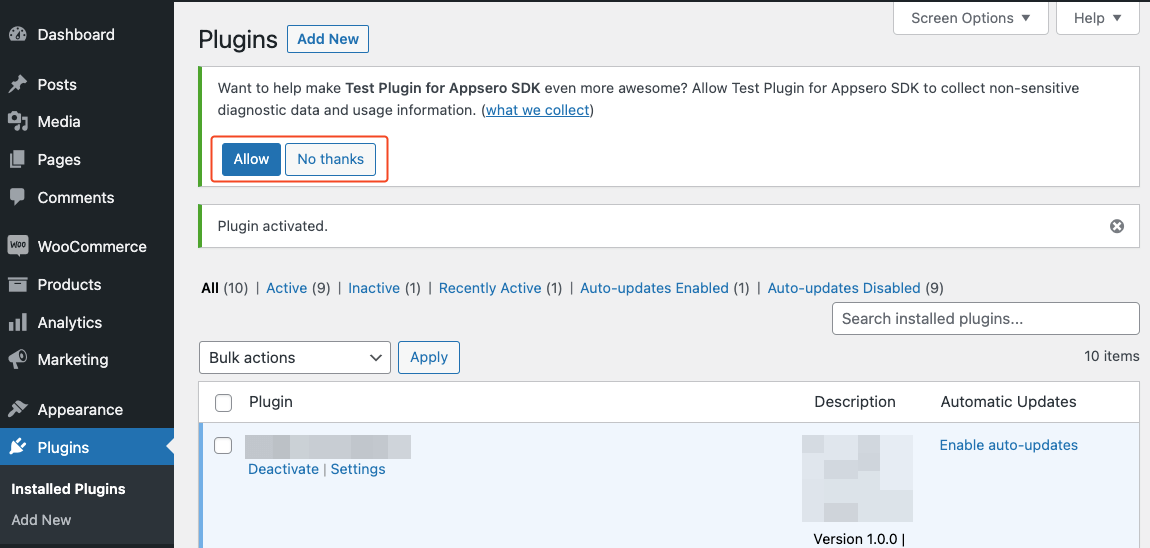
The presence of Allow and No Thanks buttons means that your SDK integration is successful and your product is ready to rock the market.
Let’s have a glimpse of what you’ve achieved after this integration. Your users will see a pop-up like the following one when they want to deactivate the plugin.
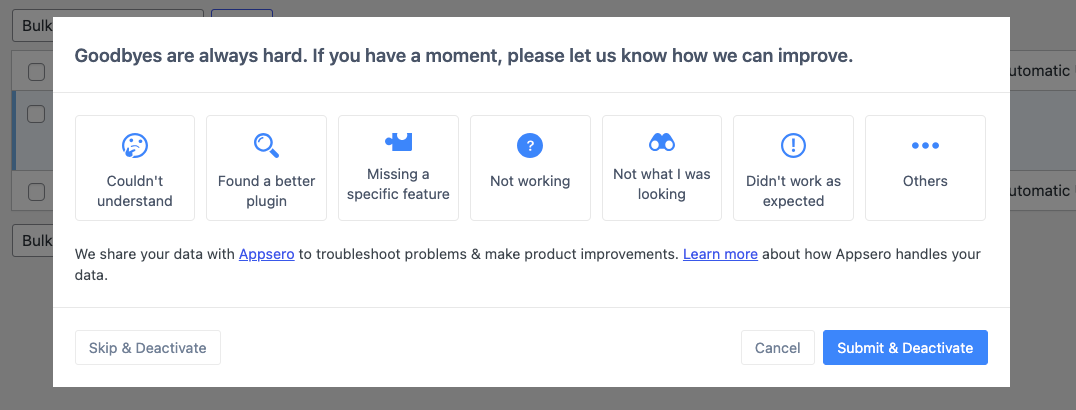
You’ll get these insights right on the Appsero WordPress analytics which can come in handy in improving the product for future releases. Learn more about Appsero’s Deactivation Auto Responder feature.
This is just a small representation of what Appsero can do for you. The SDK integration opens a threshold to amazing WordPress product management capabilities for all developers.
7. Create a product release
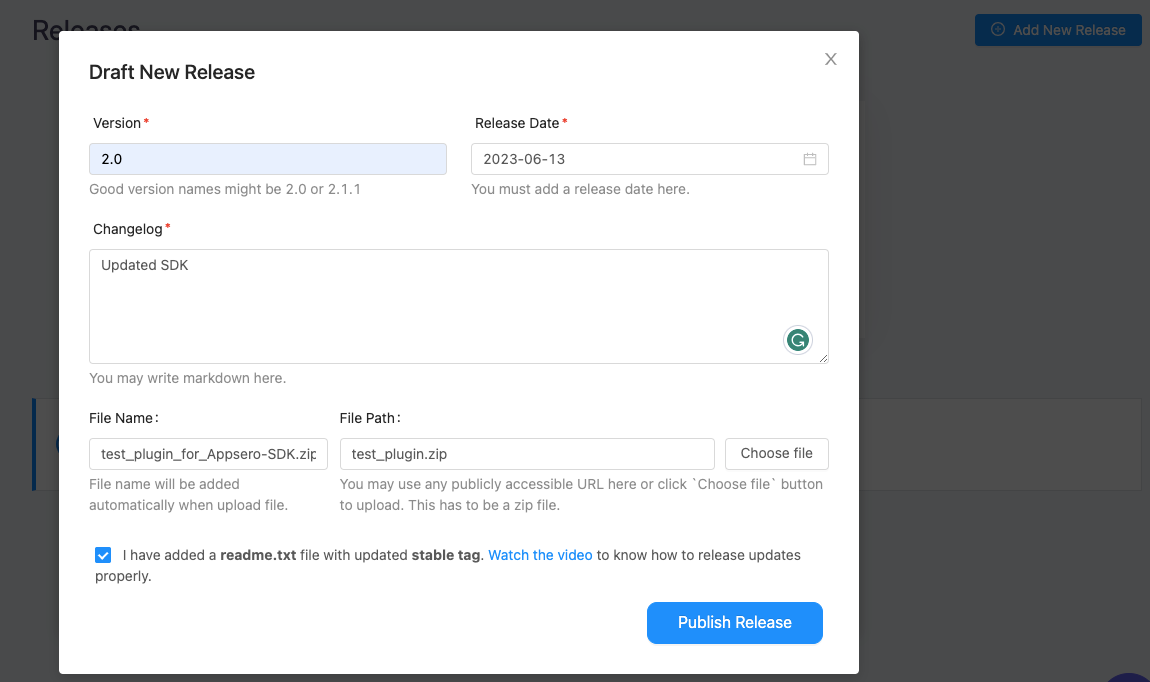
You’re just one step away from achieving the amazing results of using Appsero. You have to create a release using Appsero to allow your users to get the download link to their inboxes.
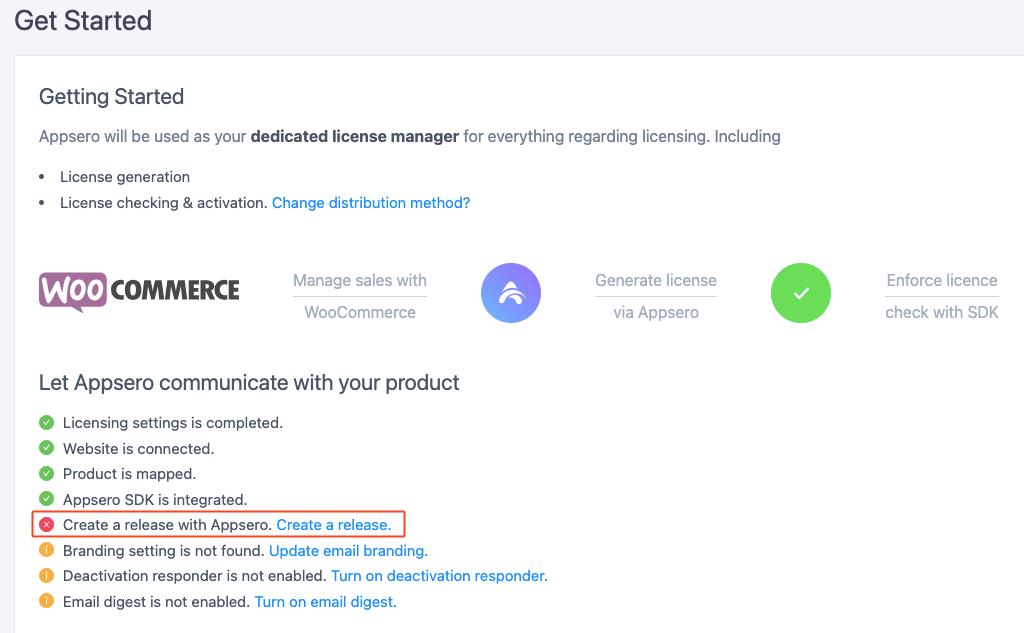
Click on “Create a release” to open the page where you can upload the product. Fill out all required fields. Mark the checkbox that says “I have added a readme.txt file with an updated stable tag.” Then, hit the Publish Release button.
You have reached the final step! All required steps are complete. Still, you can get additional services from Appsero by updating email branding, turning on the deactivation responder, and turning on email digest.
8. Start selling with your chosen platform
Did you upload the final ZIP file (with updated SDK) to your product on the WooCommerce store? I guess you didn’t. Now edit the product and add this file to your online store. You can control the download limit and expiry period from here.
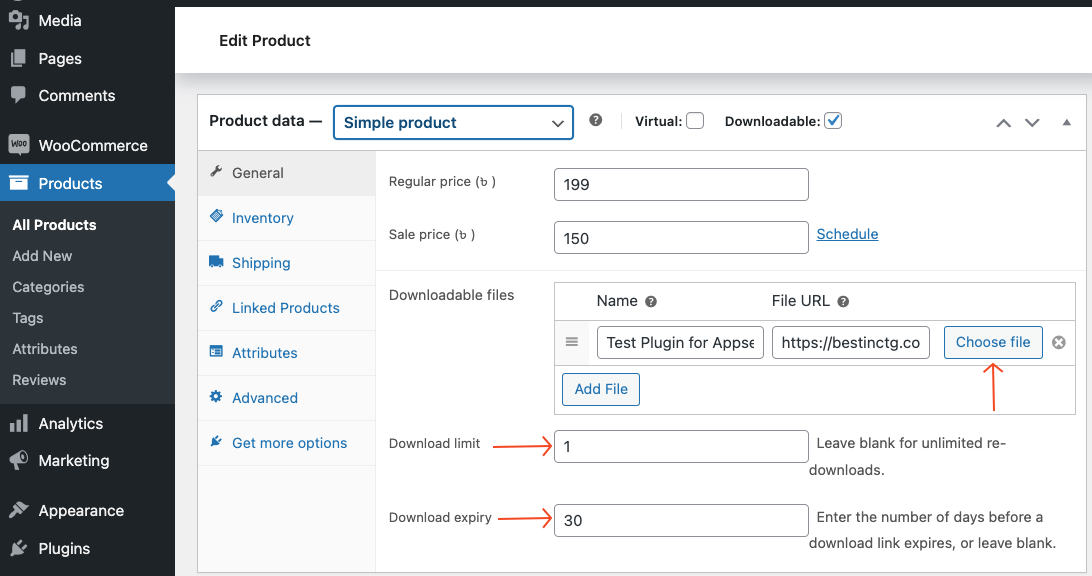
Adding this product here will enable your users to download the product both from their email inbox (sent by Appsero) and from their WooCommerce account’s dashboard.
Once they become your customer, you can send out further releases via Appsero’s automated process of pushing new updates.
Why it’s important to keep the Appsero SDK up to date
Regularly updating the Appsero SDK is crucial for several reasons. It ensures your WordPress analytics data is accurate and reliable. Updates often include bug fixes, security enhancements, and new features that can improve the performance and functionality of your products. By staying up to date, you can leverage the full potential of the Appsero SDK and make decisions based on reliable data.
If you are already using Appsero in any of your plugins/themes and integrated the SDK before into your projects, don’t forget to update to the latest version of the Appsero client. Learn how you can update Appsero SDK.
Contact the support team when required
If you face any difficulties at any step- reach out to our support team. They’re super efficient and always ready to provide you with assistance during the Appsero SDK update/integration process. They are dedicated to providing prompt and helpful support to help you make the most of the Appsero license management platform. You should not hesitate to contact them whenever any issue arises.
Use Appsero to manage your next WordPress project
You can do a lot of things within the Appsero dashboard. This includes setting up license keys, managing licensing models (e.g., free or premium), and defining license restrictions, if applicable. Appsero also comes with powerful analytics features to gain insights into user behavior, product performance, and conversions.
It integrates with various third-party tools and services, allowing you to extend the capabilities of your WordPress project. So, this is the right tool that can help you effectively utilize and manage your next WordPress project, streamline processes, gain insights, and optimize your product’s performance.
Subscribe To Our Newsletter
Don’t miss any updates of our new templates and extensions
and all the astonishing offers we bring for you.


