How to Build a WooCommerce Store That Sells Digital Products or Software (Step-by-Step Guide)
If you’re planning to launch your own online platform to sell digital products or software, WooCommerce is one of the best tools you can choose. It’s a powerful, open-source eCommerce solution that lets you turn any WordPress website into a fully functional online store without any coding.
Whether you’re offering downloadable software, plugins, eBooks, courses, or licenses, WooCommerce gives you the flexibility to manage your digital product listings, secure file delivery, payments, and even license activation with ease.
In this complete guide, we’ll walk you through the entire process of building a WooCommerce store specifically designed for selling digital goods. From store setup and product configuration to payment gateways and license management, you’ll learn exactly how to create a professional, scalable platform that’s ready to sell.
So let’s dive in and start building your digital product store the right way.
What WooCommerce Offers for Your Online Store?

WooCommerce is a powerful, free plugin that turns any WordPress website into a customizable, scalable eCommerce platform. Whether you’re selling physical products, subscriptions, or digital goods like software, WooCommerce gives you the tools to launch and grow your store with ease. Here’s a closer look at the key benefits:
a. Easy Setup
WooCommerce offers a straightforward installation process directly from your WordPress dashboard. Even if you’re new to WordPress, you can get your store up and running within a few hours.
b. Extensive Customization
One of the biggest strengths of WooCommerce is its flexibility. It’s compatible with thousands of free and premium WordPress themes, allowing you to create a storefront that matches your brand identity. Additionally, you can extend functionality using plugins for SEO, marketing automation, shipping, memberships, and more.
c. Built for Digital Products
WooCommerce isn’t just for physical goods. It’s also great for selling downloadable items like software, eBooks, music, courses, or design templates. You can easily enable “virtual” and “downloadable” options for each product, attach files, and automate delivery to customers upon purchase.
d. Flexible Payment Options
From global gateways like Stripe, PayPal, and Apple Pay to local solutions such as bank transfers or cash on delivery, WooCommerce supports a wide range of payment methods. You can offer multiple options at checkout, and even integrate with WooCommerce Payments to manage transactions directly within your WordPress dashboard.
e. Scalable Functionality
Whether you’re running a one-product shop or a full-fledged marketplace with thousands of SKUs, WooCommerce scales with your business. You can start small and expand as needed by adding plugins for subscriptions, multilingual support, advanced analytics, multi-vendor capabilities, and more. Explore the best eCommerce marketing strategies to scale your business.
How to Create a WooCommerce Store (in 8 Steps)
You can build your WooCommerce store manually, but it’s time-consuming and limits your ability to add advanced features and design custom layouts.
But instead of doing everything manually, we’ll speed things up using Ultimate StoreKit for store design and Appsero for license and product management. These tools help you skip the complicated technical setup so you can focus on what matters—your products.
So, without further ado, let’s walk through each step.
Step 01: Install WooCommerce
The first thing you need to do is install the WooCommerce plugin on your WordPress site. This is the engine behind your entire store. It powers everything from product listings to payments.
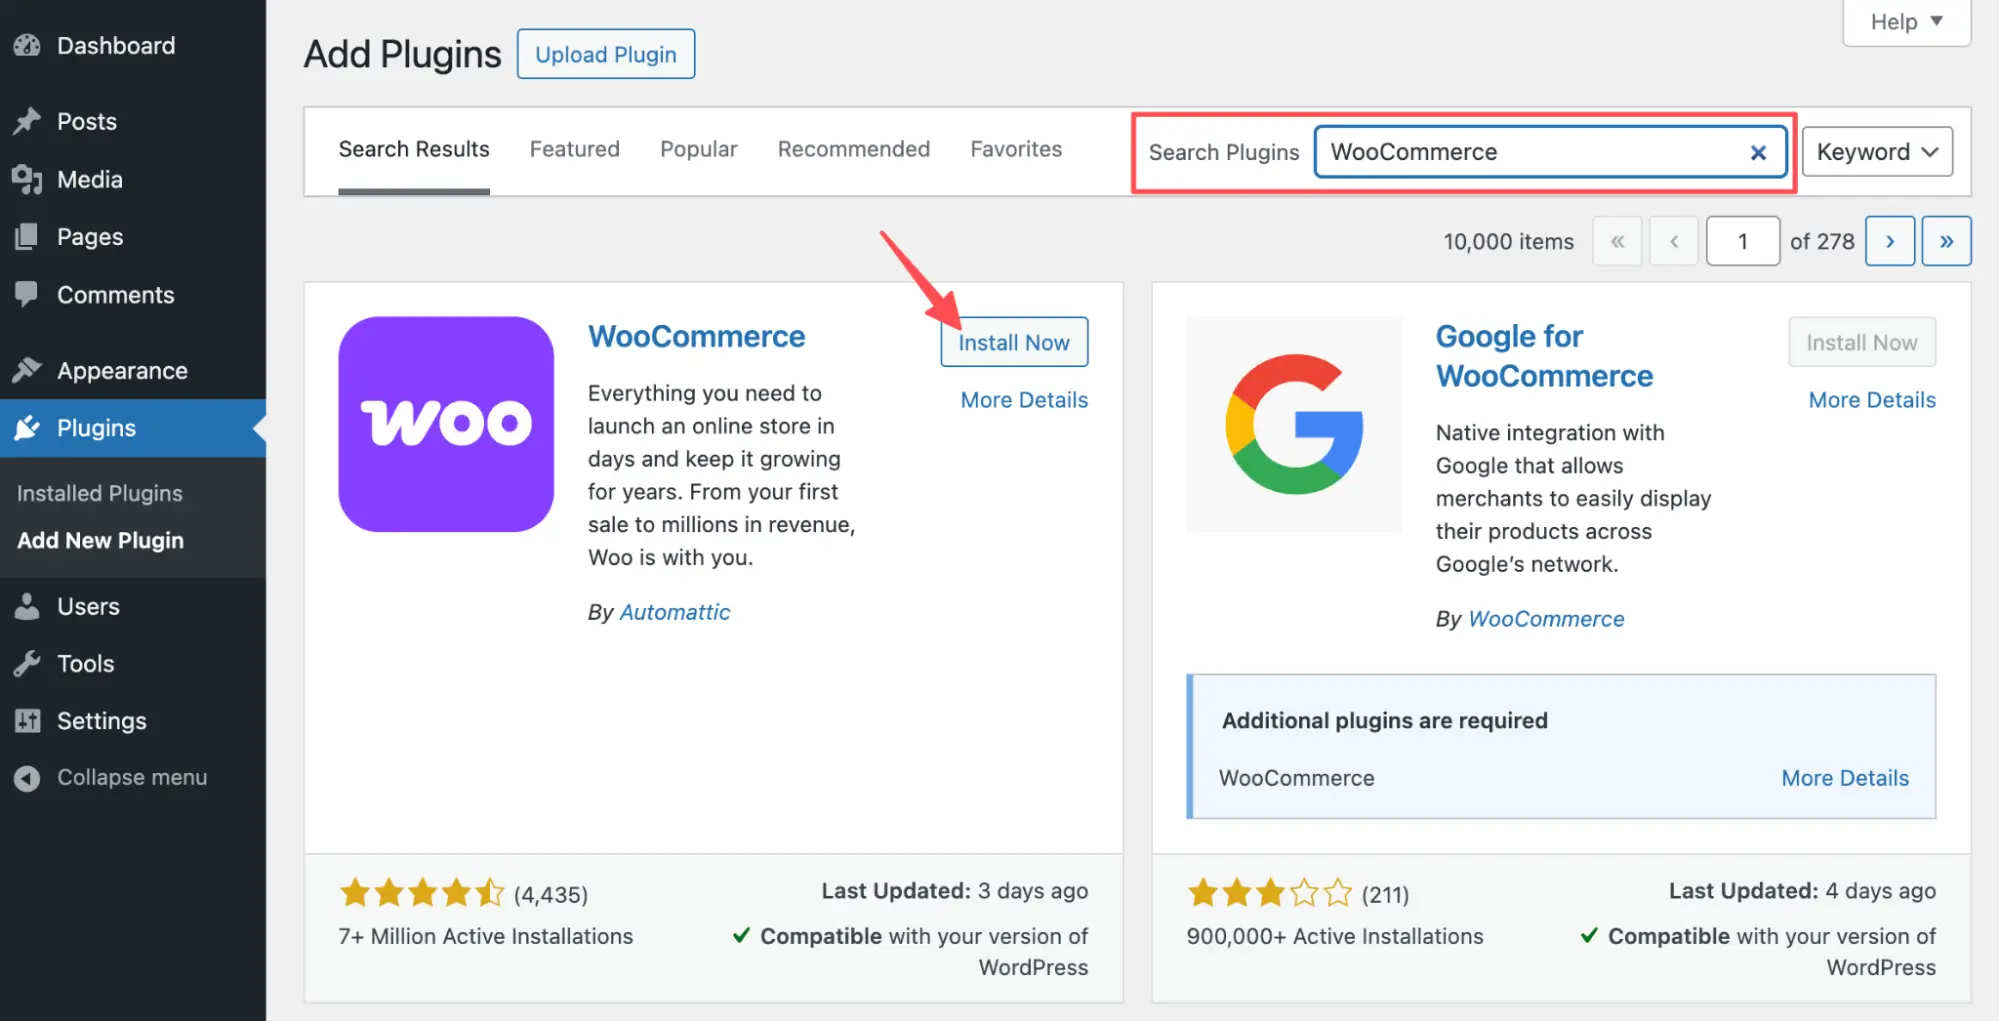
To install WooCommerce:
- Go to your WordPress Dashboard
- Navigate to Plugins > Add New
- Search for “WooCommerce”
- Click Install Now, then hit Activate
Once activated, WooCommerce automatically launches its Setup Wizard. Don’t worry, just follow the on-screen guidance and set up your store configuration.
Access the WooCommerce Setup Wizard
The Setup Wizard helps you get your store’s foundation ready with just a few simple steps:
- Store Details: Enter your store’s address, preferred currency, and contact information.
- Industry: Select your store category. If you’re selling software, pick “Other.”
- Product Types: Choose Downloads to configure your store for digital products like plugins, themes, or apps.
- Business Features: You can opt into helpful tools like email marketing integrations or automated tax calculations.
- Recommended Plugins: WooCommerce may suggest additional plugins like WooCommerce Payments, MailPoet, and Jetpack. Install them based on your store’s needs.
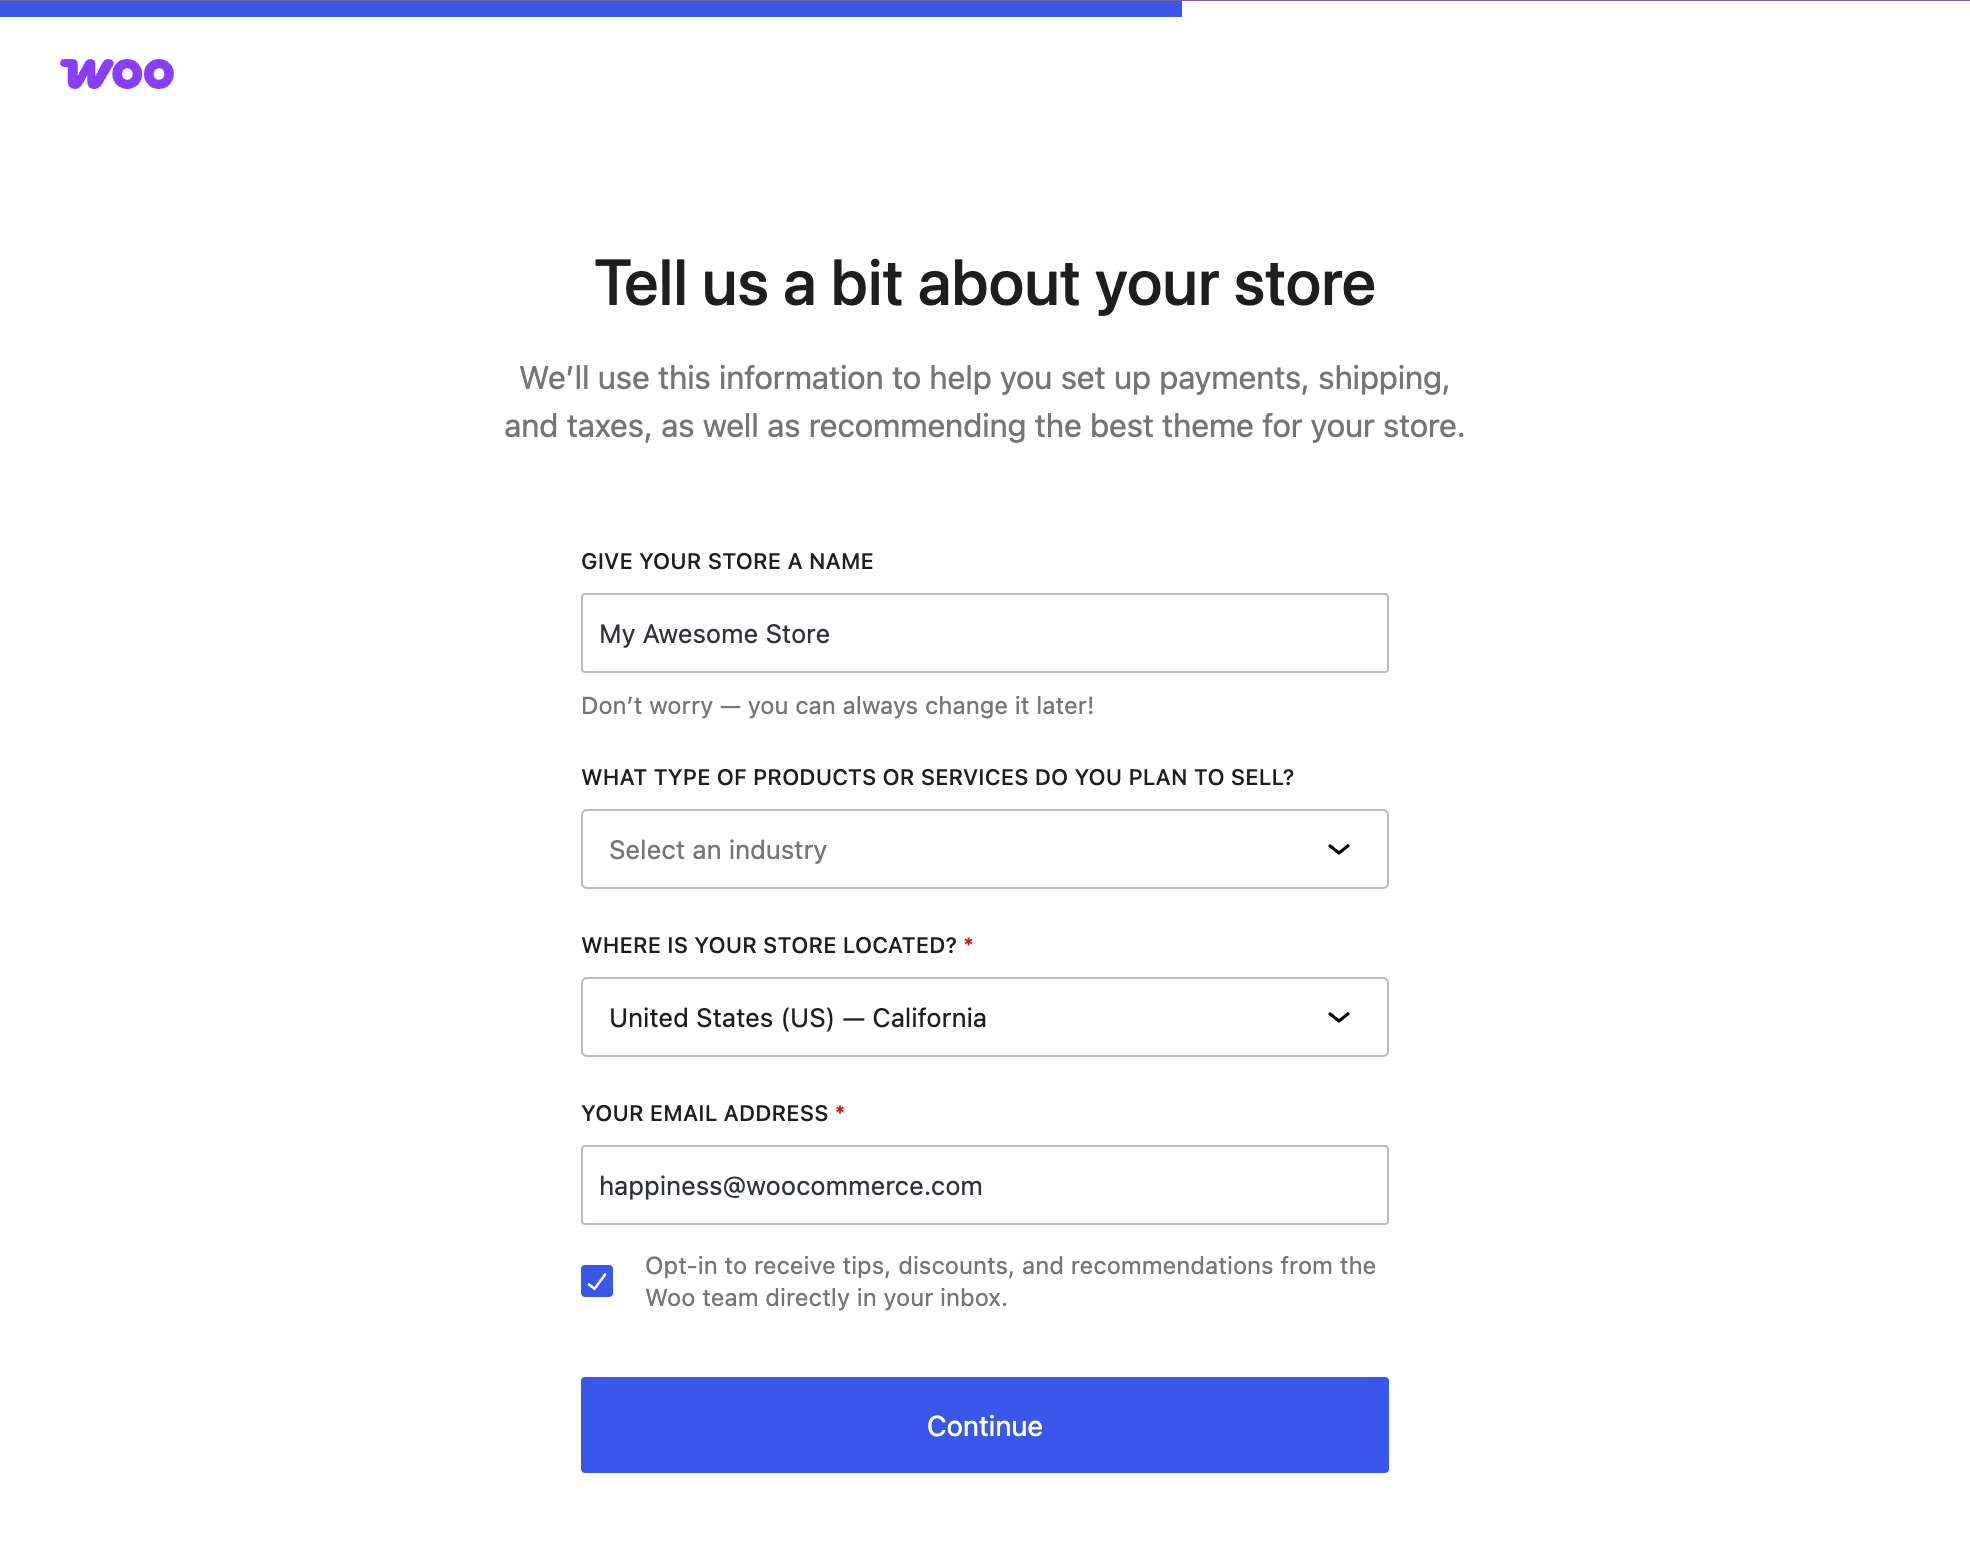
Once completed, WooCommerce will automatically generate essential pages such as Shop, Cart, Checkout, and My Account, and apply some key default settings.
Now, you’re ready to move forward and start building your store’s visual and functional layers.
Step 02: Choose a WooCommerce Template and Theme
To make your store visually appealing and user-friendly, the next step is to install a WooCommerce-friendly theme. The right theme sets the tone for your brand and ensures your visitors have a smooth browsing experience.
When selecting a theme, focus on a few key qualities like speed optimized to keep your pages loading quickly, compatibility with WooCommerce, and supports drag-and-drop customization, so you can tweak your store’s layout and design easily without writing any code.
There are many great themes available, such as Astra, OceanWP, and Storefront, which offer excellent performance and flexibility.
However, for maximum design freedom, pairing your theme with Elementor is an unbeatable combination. Elementor is a powerful visual page builder that lets you customize every part of your store, from headers and footers to product grids and pricing tables, using a simple drag-and-drop interface.
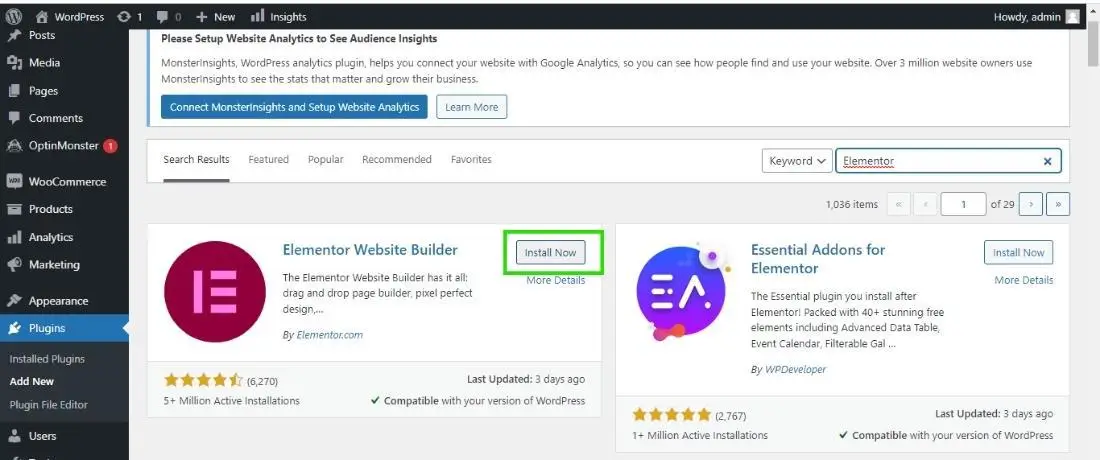
How to Install Elementor:
- Go to Plugins > Add New in your WordPress dashboard
- Search for Elementor
- Click Install Now, then Activate
Once active, you can start designing your store pages visually using Elementor’s drag-and-drop editor.
Step 3: Add and Manage Products in WooCommerce
Now it’s time to add your products. It can be both physical and digital products.
Since, here,we’ll focus on digital products like software, themes, or plugins, you’ll need to set up each item a bit differently than physical goods. Thankfully, WooCommerce makes this process easy.
To start, go to Products > Add New from your WordPress dashboard. Give your product a clear name and write a detailed description so users know exactly what they’re getting. You can also add categories and tags to keep your store organized, and don’t forget to upload a featured image that represents your product visually.
Now scroll down to the Product Data section. Here’s what to do:
- Check Virtual, since it’s not a physical product
- Check Downloadable, this will let you upload the software file (like a .zip or installer)
- Add the file name and upload the downloaded file
- Set optional rules like download limits or expiry dates
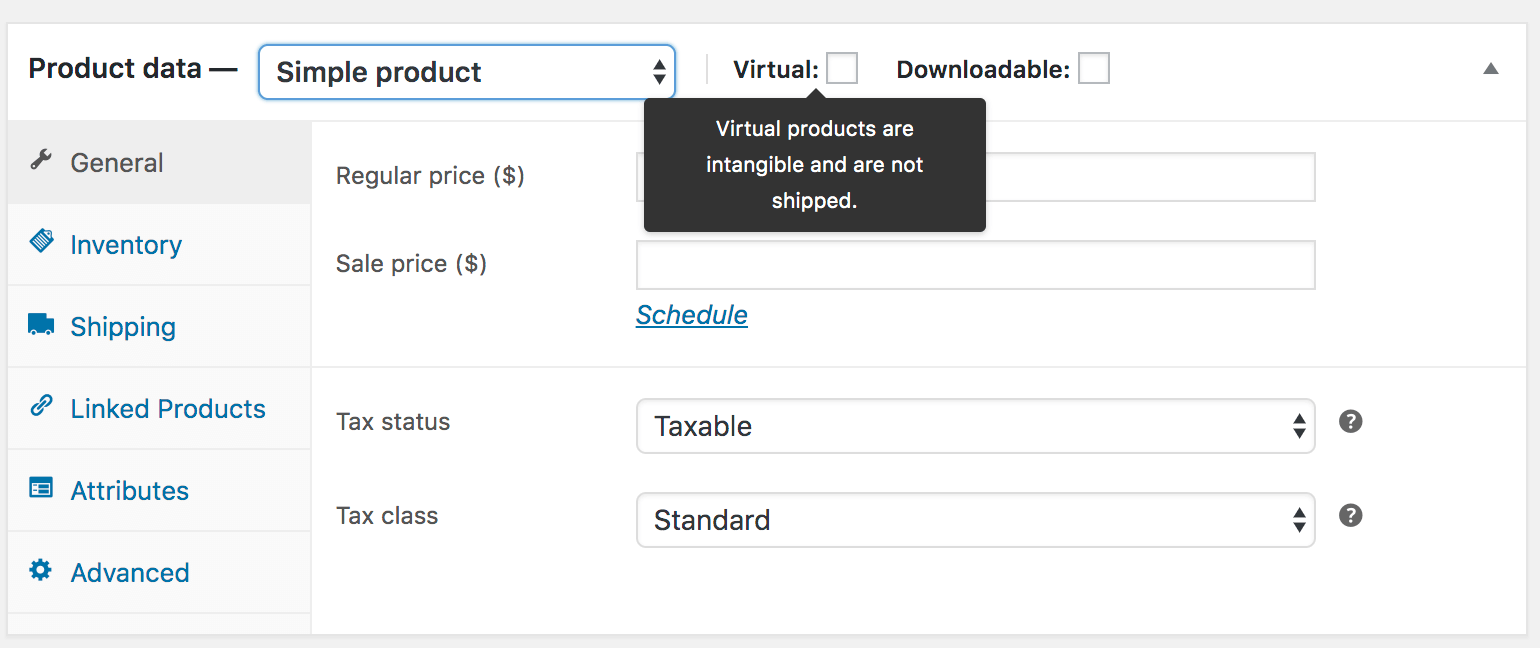
Then, upload your .zip files or installers and set important details like:
- File name and download path
- Download limits and expiry dates
- License tiers, version numbers, and changelogs
You can also include version numbers, changelogs, and licensing info here to help customers understand what they’re getting and keep their software up to date.
Step 4: Create WooCommerce Pages with Storekit
WooCommerce automatically creates essential pages like Shop, Cart, Checkout, and My Account during the Setup Wizard. But if you skipped that part or want better design flexibility, creating and styling these pages manually can be time-consuming.
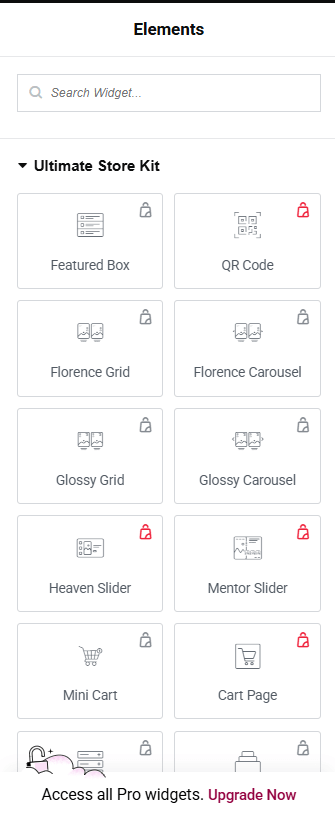
That’s where Ultimate Store Kit comes in handy.
It’s a powerful Elementor-based plugin that offers pre-built templates and advanced design blocks specifically for WooCommerce and Easy Digital Downloads (EDD) stores.
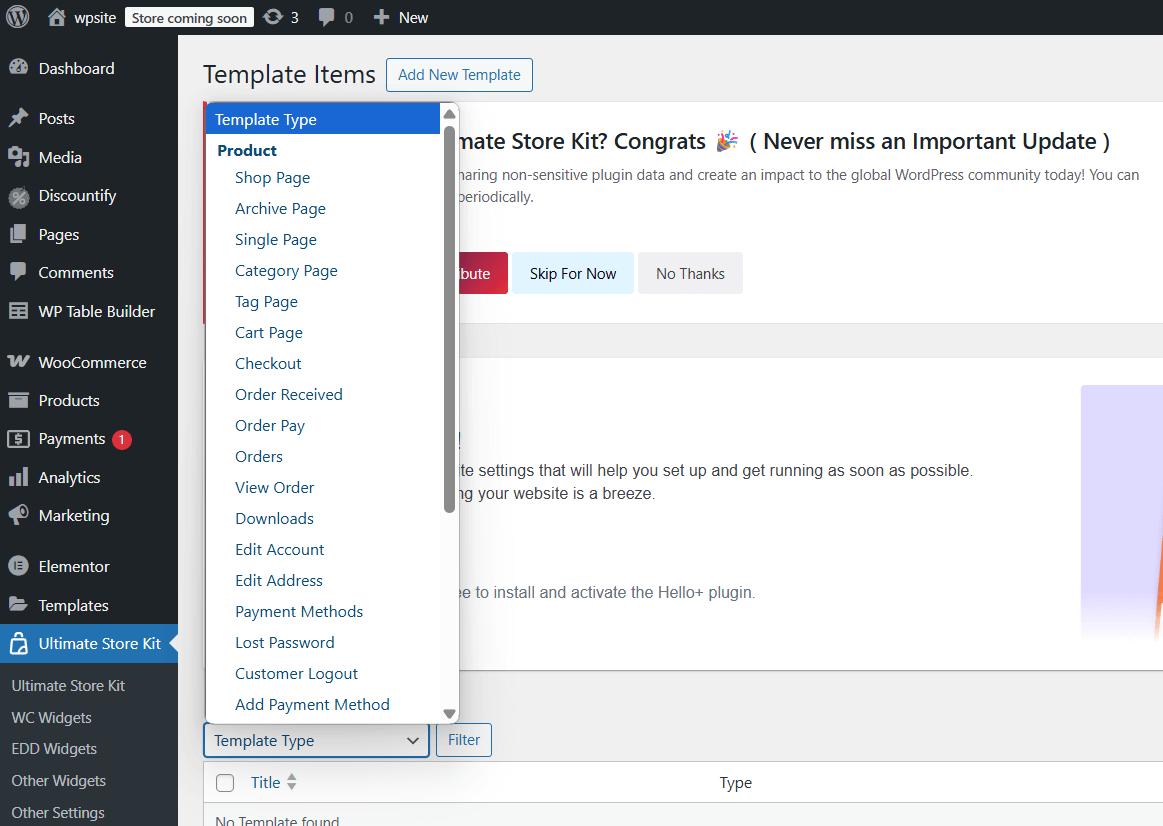
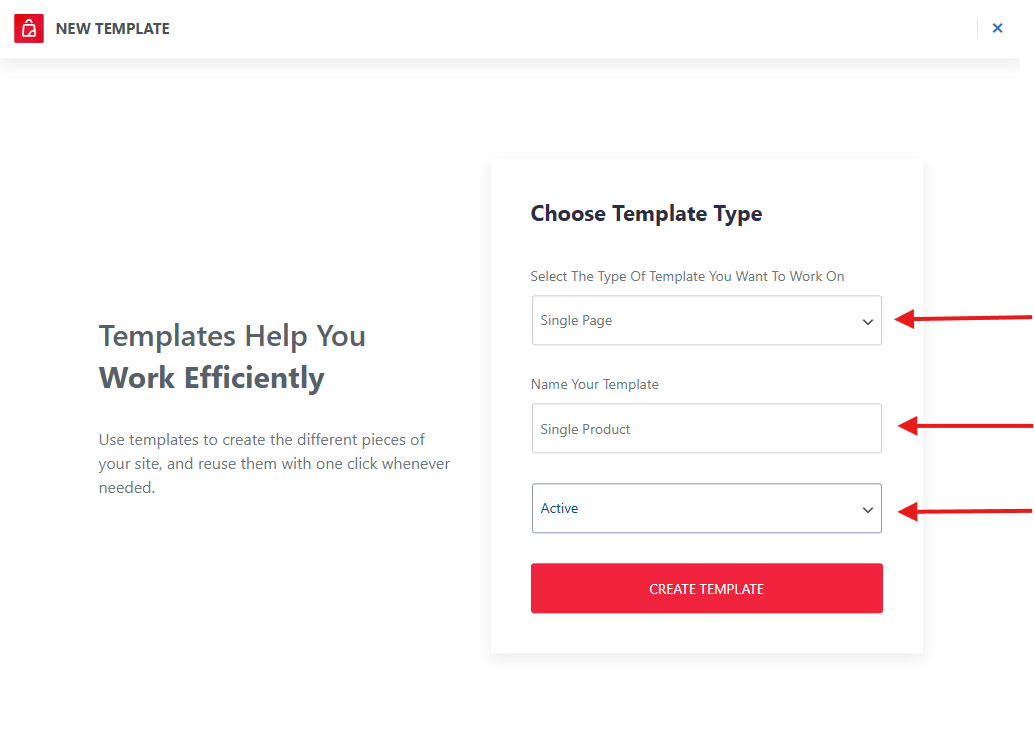
Here’s how to get started:
- Head over to Storekit > template builder from your WordPress dashboard.
- Click the template type in the Ultimate Store Kit Templates section.
- Browse StoreKit’s pre-built designs tailored for WooCommerce and Easy Digital Downloads.
And, after selecting the template, you can edit it according to your need. And, it’ll just take a few clicks, because the storekit’s pre-built templates are already customized and include all the essential elements for making a perfect page from shop to checkout.
Simply provide the essential data, and StoreKit EDD widgets will automatically create all the necessary store pages for you.
Step 5: Customize Your Store
Beyond the basics, you’ll want to tweak the store’s look and feel. With Ultimate StoreKit, customization is straightforward and code-free.
What You Can Build with StoreKit
StoreKit includes a rich set of elements that make page creation fast, visual, and conversion-friendly, especially for digital sellers:
Once your core pages and products are in place, it’s time to elevate your store’s design and functionality. StoreKit makes customization easy with pre-designed Gutenberg blocks and templates—no coding needed.
Whether you’re selling WordPress plugins, themes, SaaS tools, or any other downloadable product, StoreKit gives you total control over layout, styling, and product presentation. Again, it offers a total of 12 EDD widgets to set up your complete store without any hassle.
Here’s how you can build a professional digital storefront using StoreKit’s EDD-style components:
- EDD Product Grids:
Create sleek, conversion-ready shop pages by dropping in product grid blocks. These allow you to:
- Display product thumbnails, names, pricing, and purchase buttons in an organized layout.
- Choose grid variations—standard, carousel, or masonry—to match your design goals.
- Add filters by category or tag for easy navigation.
- Product Review Carousels:
Use Ultimate StoreKit’s carousel blocks to feature testimonials and product reviews. These sliders:
- Add social proof and credibility.
- Support client logos, ratings, and short quotes.
- Can be placed on product pages, landing pages, or homepage hero sections.
- Feature Tabs & Blocks:
Need to explain your product in-depth? StoreKit’s feature tabs let you:
- Separate changelogs, feature lists, and licensing info into organized, interactive tabs.
- Keep long-form content clean and digestible.
- Highlight the value of each pricing tier or plugin version.
This is especially useful when selling software with multiple versions or update cycles. You can even insert dynamic pricing tables to encourage upsells and bundle purchases.
- Account Area Modules:
Want your users to manage their purchases and licenses effortlessly?
- Use StoreKit’s pre-styled modules to display download history, license keys, and support links.
- Add a secure login and registration area that matches your store’s branding.
- These modules integrate seamlessly with WooCommerce’s native account pages.
- Additional Highlights:
- Product Feature Blocks: Cleanly showcase key benefits, compatibility info, or what’s included in each version.
- Carousel & Tabbed Sections: Ideal for promoting software categories, seasonal deals, or version comparisons without overwhelming the layout.
StoreKit makes your WooCommerce software store look like it was built by a design agency, while still being completely editable in the block editor.
All these widgets are Gutenberg-compatible, making it easy to mix and match layouts.
Step 6: Manage Your Digital Product License with Appsero
Now that your products are live and your store is customized, it’s time to manage everything behind the scenes. This includes handling orders, inventory, customer communication, and if you’re selling digital products like software, license management becomes especially important.
Manually managing software licenses, updates, and usage tracking can be time-consuming and error-prone. So, you can use plugins to easily manage your software product license. That’s where tools like Appsero come in.
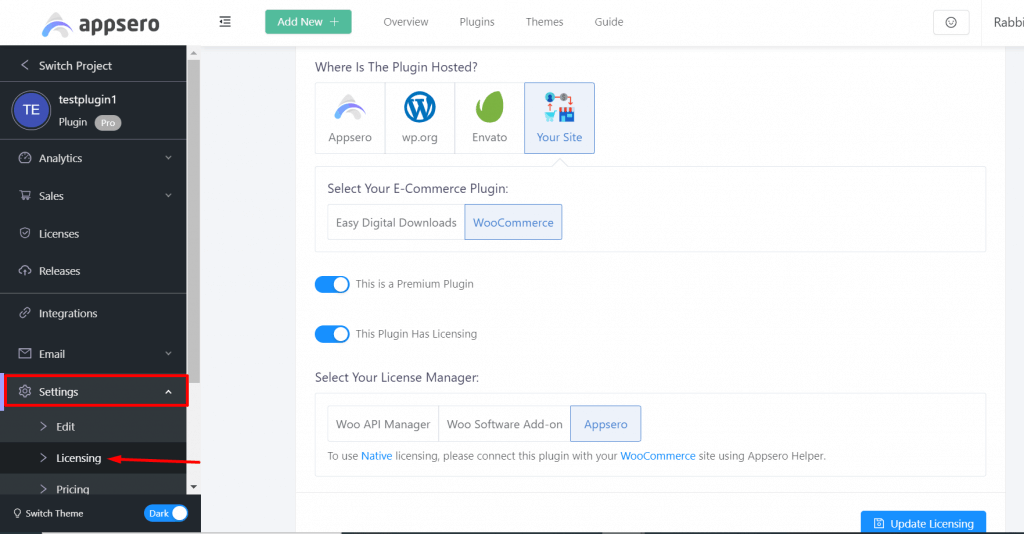
Appsero is a powerful SaaS platform built specifically for WordPress product developers. It automates the entire software distribution process for WooCommerce-based stores. With Appsero, you can:
- Automatically generate and validate license keys for each purchase.
- Push plugin or theme updates directly to your customers’ WordPress dashboards.
- Restrict access to updates for users without valid licenses.
- Track activations, deactivations, and usage analytics in real-time.
Whether you’re selling one plugin or an entire library of digital products, Appsero gives you a centralized dashboard to handle licensing and product delivery, without writing a custom system from scratch.
How to Set Up Appsero for WooCommerce:
- Sign up at Appsero.com and log in to your dashboard.
- Click ‘Add Plugin’ and fill out the details.
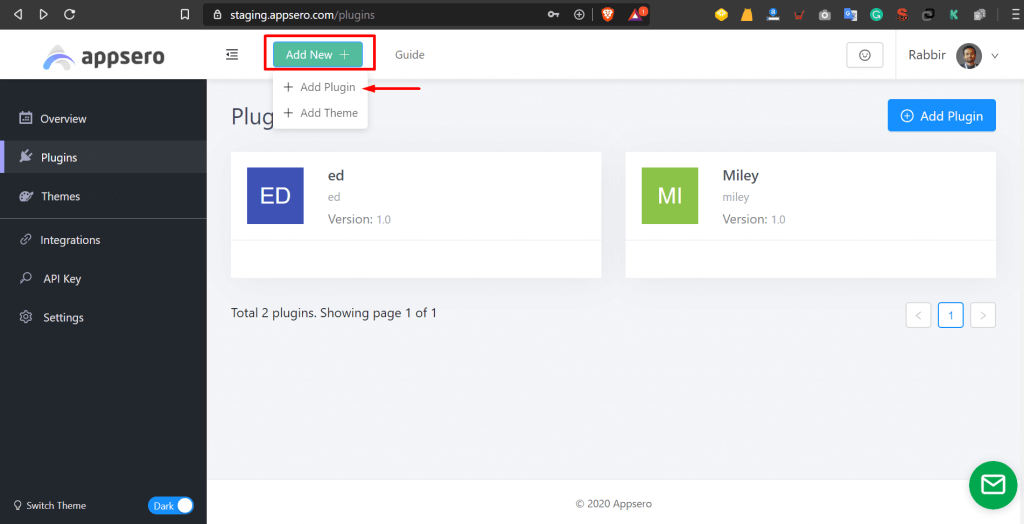
3. Select WooCommerce as the distribution platform.
4. Upload your plugin or theme file (ZIP format).
5. Appsero will generate a unique API key and provide integration instructions.
6. Add the generated Appsero code to your plugin/theme’s functions.php file or main plugin file.

7. Your product is now ready to issue license keys, track activations, and send auto-updates.
Appsero will handle the rest, including pushing updates to licensed users only.
Step 7: Set Up WooCommerce Payments
Since we’re building a store to sell digital products like software, there’s no need to set up shipping options or worry about tax rules for physical goods. In most cases, digital items are tax-exempt or follow simplified tax policies depending on your region. So, we’ll skip those steps and jump straight into setting up payments.
Here are some popular and best gateways to accept payments with WooCommerce:
WooCommerce makes it easy to connect your store with trusted payment gateways. Some popular options include:
- Stripe: Great for accepting credit and debit cards globally.
- PayPal: Ideal for users who prefer fast, secure payments with their PayPal accounts.
- WooCommerce Payments: Built directly by WooCommerce for seamless checkout and centralized management.
You can activate any of these from WooCommerce → Settings → Payments in your dashboard. Just choose your preferred gateway, click Set up, and follow the instructions.
Pro Tip: Always test your payment process in sandbox or test mode before going live. It helps ensure everything—from checkout to confirmation emails—works smoothly.
Step 8: Publish Your Store
You’re almost done! Before going live, make sure everything works properly.
- Preview all pages on desktop and mobile
- Test the checkout and license key delivery flow
- Verify that downloadable files work
- Ensure Appsero is active and tracking licenses
Once satisfied, publish your site and start sharing it with your audience.
Final Thoughts
In this guide, you’ve learned how to build a WooCommerce store in just eight clear steps. While WooCommerce itself is powerful, using tools like StoreKit and Appsero helps you build a scalable, license-managed software store faster and smarter.
By combining WooCommerce’s flexibility with StoreKit’s design freedom and Appsero’s robust licensing tools, you’ll have a fully operational store tailored for selling software, without needing to write a line of code.
Ready to launch your store? Let’s do it.
Subscribe To Our Newsletter
Don’t miss any updates of our new templates and extensions
and all the astonishing offers we bring for you.


